


Source link Read More


You get into your car, plug in your phone, and Android Auto appears on the dashboard. You open Google Maps, set the destination, and then switch to Spotify to start your AI playlist.
It works and gets you from A to B with a soundtrack, but the experience could be better.
I’ll cover seven tips, from simple interface tweaks that cut distractions to automation that starts a trip with one voice command.
When you first start using Android Auto, the app launcher on your car’s screen is arranged alphabetically. This is rarely the most efficient layout.
Your most-used apps — like Waze for traffic, Spotify for music, or Pocket Casts for podcasts — might be buried at the bottom of the list, forcing you to scroll while you should be focused on the road.
Spend two minutes organizing the launcher to pin essential apps in the top row for one-tap access. Here’s what to do:
Some actions you perform on every drive. This can be calling your partner, checking your schedule, or navigating home. While voice commands are great, they can sometimes be slow or fail in a noisy car.
This trick lets you create one-tap shortcuts for your most common actions directly on your app launcher. Go to Android Auto settings > Customize launcher > Add a shortcut to the launcher.
For a call shortcut, tap Call a contact, pick the person you want from your contacts list, and a new icon with their name will appear in your launcher.
For an Assistant shortcut, tap An Assistant action, type the command you would normally say (for example, “What’s on my calendar today?”).
Give it a short label and tap Create shortcut. You’ll now see a button in your launcher that runs the command instantly.
The car is often a shared space. Whether carpooling with colleagues, driving your kids, or on a road trip with friends, you don’t necessarily want the content of your incoming text messages displayed on the dashboard for everyone to see.
With this setting, notifications won’t display message previews, keeping conversations out of sight.
Now, when a new message arrives, Android Auto will still alert you that you have a message and who it’s from, but the content of the message will not be displayed. You can tap the notification to have Google Assistant read it aloud to you.
This is one of the most powerful efficiency tools in Android for drivers. Instead of performing the same four or five actions every time you get in the car, bundle them into a single routine.
Now, the next time you get in the car, say your chosen phrase, and Google Assistant will take care of everything. Imagine exiting the office and saying, “Hey Google, I’m coming home.”
Instantly, Google sends a text to your partner that says, “I’m coming home, do you need me to get anything?’ Then, Google Maps launches and sets your route to home, while your playlist starts playing.
You can also get creative and add smart home actions to the routine. For example, the thermostat can adjust to a comfortable temperature, or the garage door can open just before you arrive.
Most of us use basic voice commands. However, Google’s assistant can understand more complex requests, especially with the expected switch to Gemini, which has greater contextual awareness.
There’s no setting to change here, just knowing what to ask. Try some of these powerful commands on your next drive:
While many new cars support wireless Android Auto, many older models still require you to plug in a USB cable. This means dealing with wires when you get in and out of the car.
A wireless adapter is a small dongle that permanently solves this problem. You plug it in once and forget about it.
From then on, your phone automatically connects to Android Auto wirelessly from your pocket or bag for a seamless experience.
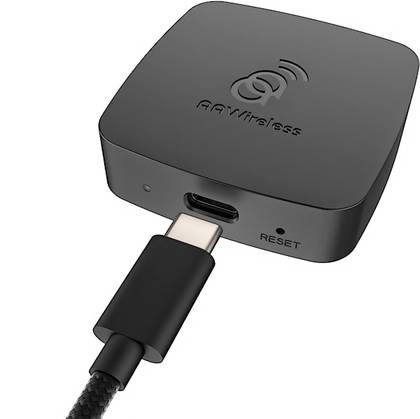
USB-C
USB-A to USB-C Cable
AAWireless
Wi-Fi, Bluetooth
Developer settings is the secret menu that lets you fine-tune Android Auto’s performance to match your specific car’s hardware. You can adjust the video resolution, collect debugging information to solve tricky issues, and much more.
Here’s how to access the settings:
If you want to explore the settings further, a few other useful settings are worth exploring.
For example, Video Resolution lets you sharpen Android Auto’s visual output up to 720p or 1080p if things look fuzzy.
There’s also an option to disable Wireless Android Auto. A wired connection can help keep your phone charged on long drives and often provides a more stable link.
I’m personally a big fan of wireless, but I know not everyone feels the same.
As we’ve seen, Android Auto is much more than a screen in your car. Pick one or two of these tricks for your next drive. You’ll be amazed at the difference it makes.


Spotify has grown from a desktop app into a platform with over 40 million tracks and three billion playlists. It is now on phones, TVs, and even game consoles, yet many powerful features remain hidden from most users.
I have spent years digging through every menu and setting. Skip the basic tips you have heard many times.
Here are 10 often-overlooked tricks that will change how you listen, discover, and manage your music.
Playlist folders let you group playlists into collapsible folders, like files on a PC. You create them on the desktop or web app, and when they exist, they appear on other devices.
In the desktop app, open Your Library, click the plus button, choose Create a playlist folder, name it, then drag playlists into it.
You can also nest folders for finer control. If you have years of playlists, folders turn endless scrolling into a tidy system.
Skip digging for that old road trip playlist. Open your Travel folder, where you’ll also find tracks you saved for your next travel reels.
When you delete a folder, every playlist inside it is deleted, too.
Spotify’s mobile app includes swipe gestures that replace multiple taps with one motion.
In any playlist or album view, swipe right on a song to add it to your queue. A brief pop-up confirms it. Swipe left to save it to Liked Songs.
What once required tapping through menus to build a queue before a drive now takes a few swipes.
Spotify lets you recover deleted playlists for up to 90 days. You can’t do this in the app.
Log in to spotify.com and open Recover playlists in the left menu to see everything you deleted in the past three months.
Select a playlist and click Restore. It appears at the bottom of your playlists in the app.
Hiding a song is useful when there’s a track you don’t like on an otherwise great album. Instead of skipping it every time, you can remove it from playback.
On mobile, tap the three-dot menu next to the track and select Hide in this album. Spotify greys it out and skips it from that playlist.
Blocking an artist goes further. Open the menu from the artist page in the mobile app and choose Don’t play this artist.
Their music stops appearing on algorithmic playlists, radio stations, and your playlists, though tracks where they are only a featured artist can still show up.
Spotify Connect lets you use your phone as a remote for Spotify on any compatible device on your network, such as a laptop, smart speaker, TV, or PlayStation.
While a song plays, tap the Device icon on the Now Playing screen to see available devices on your Wi-Fi. Select one, such as your living room speaker, to transfer playback instantly.
You can walk in the door listening to a podcast, transfer it to your smart speaker, and continue listening without missing a word.
Spotify’s search bar supports advanced commands to filter results precisely. Here are a few simple modifiers to zero in on what you want:
You can use any combination of the advanced search options to find exactly what you want.
For example, genre:”lofi” year:2018-2020 label:”chillhop records” would pull up lo-fi tracks released between 2018 and 2020 under Chillhop Records.
Spotify’s core strength is its recommendation engine. Each algorithmic playlist serves a specific job.
Learn how they work, and you move from passive listening to actively discovering songs you’ll love.
Your actions train these playlists. Save or add a song to signal you like it. Skip a track within the first 30 seconds to signal the opposite.
Spotify uses this feedback to refine your taste profile and sharpen recommendations, so use each list with intent.
Open Discover Weekly when you want something new. Check Release Radar to stay current with your favorite artists. Turn to Daily Mixes for familiar sounds with a few fresh surprises.
Spotify lets you set the bitrate (audio fidelity) to balance sound quality and data use. Higher bitrates sound better but use more data.
In Settings > Audio Quality, you’ll find separate options for streaming and Downloads.
If you use data, set playback to Normal (around 96 kbit/s) or High (around 160 kbit/s).
Use Very High (around 320 kbit/s; Premium only) for full quality on Wi-Fi and Downloads.
Downloads happen once and save locally, so you get the best quality with no ongoing data use.
Two Spotify toggles, Gapless Playback and Crossfade, make playlists flow like a pro mix.
Gapless Playback removes the silence between tracks. Crossfade blends tracks, fading one out as the next fades in.
These features are useful for albums designed to play continuously. Classic records such as Pink Floyd’s The Dark Side of the Moon and the Beatles’ Abbey Road were designed to play like this.
Instead of hearing separate tracks, these toggles let you hear the album as intended, a continuous playthrough that maintains energy.
You will find both in Settings > Playback. Turn on Gapless Playback and Crossfade, and set the overlap with the slider. A 3- to 5-second fade usually works best and keeps transitions smooth.
Spotify’s mobile app includes a sleep timer that stops music or podcasts after a set duration.
On the Now Playing screen, tap the three-dot menu in the upper-right corner and select Sleep timer.
Choose a duration from five minutes to one hour, or select End of track to stop when the current song finishes.
There is a clock icon on the playback screen for this feature on podcasts.
This is useful if you fall asleep to audio. The timer prevents playlists or episodes from running all night, reduces battery drain, and avoids a loud surprise at 3 a.m.
Spotify’s beauty is that it’s always evolving. Over the years, it has added many useful features that distinguish it from rivals.
Now, the platform is entering a new era with AI-driven features like AI DJ and AI playlist creation, giving you a handpicked listening experience.
The key is to step past the defaults and experiment. Start with one of the tweaks from this list, then keep exploring as new features roll out.


Oh hey there! If you’re here, it must be time for Wordle. As always, we’re serving up our daily hints and tips to help you figure out today’s answer.
If you just want to be told today’s word, you can jump to the bottom of this article for today’s Wordle solution revealed. But if you’d rather solve it yourself, keep reading for some clues, tips, and strategies to assist you.
Originally created by engineer Josh Wardle as a gift for his partner, Wordle rapidly spread to become an international phenomenon, with thousands of people around the globe playing every day. Alternate Wordle versions created by fans also sprang up, including battle royale Squabble, music identification game Heardle, and variations like Dordle and Quordle that make you guess multiple words at once.
Wordle eventually became so popular that it was purchased by the New York Times, and TikTok creators even livestream themselves playing.
The best Wordle starting word is the one that speaks to you. But if you prefer to be strategic in your approach, we have a few ideas to help you pick a word that might help you find the solution faster. One tip is to select a word that includes at least two different vowels, plus some common consonants like S, T, R, or N.
The entire archive of past Wordle puzzles was originally available for anyone to enjoy whenever they felt like it, but it was later taken down, with the website’s creator stating it was done at the request of the New York Times. However, the New York Times then rolled out its own Wordle Archive, available only to NYT Games subscribers.
It might feel like Wordle is getting harder, but it actually isn’t any more difficult than when it first began. You can turn on Wordle‘s Hard Mode if you’re after more of a challenge, though.
A criminal.
Mashable Top Stories
There are no recurring letters.
Today’s Wordle starts with the letter F.
Get your last guesses in now, because it’s your final chance to solve today’s Wordle before we reveal the solution.
Drumroll please!
The solution to today’s Wordle is…
FELON.
Don’t feel down if you didn’t manage to guess it this time. There will be a new Wordle for you to stretch your brain with tomorrow, and we’ll be back again to guide you with more helpful hints.
Are you also playing NYT Strands? See hints and answers for today’s Strands.
Reporting by Chance Townsend, Caitlin Welsh, Sam Haysom, Amanda Yeo, Shannon Connellan, Cecily Mauran, Mike Pearl, and Adam Rosenberg contributed to this article.
If you’re looking for more puzzles, Mashable’s got games now! Check out our games hub for Mahjong, Sudoku, free crossword, and more.
Not the day you’re after? Here’s the solution to today’s Wordle.


As an Android user, I know my phone is worth more than I can even think in terms of what it is capable of. Apps offer the best use cases possible, there are abundant Android tips and tricks that often channel the best of things you can do on your device.
There are practically dozens of hidden easter eggs and features that often go unnoticed, but hey, we notice them every day. Presenting our picks of the five best Android tips and tricks of this month that ensure you can make your device faster, smarter, and better, every day.
I use a Samsung, and the worst part, I would say, is the bloatware installed on the phone. I mean, I don’t need 10s of apps that I won’t use anyway. These unnecessary apps add to my app drawer, consume resources, and cause chaos when they’re not needed. Since bloatware or pre-installed apps are signed on the system image, they are harder to get rid of.
There are basically two ways to steer away from them. First is to uninstall whatever apps you can, say half or less than half of all the bloatware, using the same method as you would to uninstall any other app. Another option is to disable the app, which will stop running even in the background, taking up less storage and other resources. Here’s how.
Alternatively,
Your Android smartphone is very powerful, and the fact is, you don’t really know how. It has a separate ‘Developer Options’ that basically allows users to force dark mode, tweak animation speed, enter USB debugging for dev tools, test app behaviors, limit background apps (that we will get back in a moment), and more. It is a source of ultimate developer-grade advanced tools that you can use to do just about anything. It isn’t enabled by default, but here’s how you can turn it on.
Do you know how many apps are trying to consume resources on your phone at every given time? Although you can tap into ‘recently used’ apps to find the ones active in the background, it doesn’t paint the whole story. Unsurprisingly, apps consume resources, and every app that you have installed, opened or not, foreground or background, has some requirements.
Oftentimes, this doesn’t hurt your user experience; however, when you want to play games or indulge in high-resource activities, that is when even a drop of power matters. You could be low on battery juice and with no way near a power source, your phone’s battery might die. Limiting background processes can unleash the kraken by limiting the number of processes that are running in the background. You can limit those background processes to zero, one, or two, or up to four, but that works like a charm.
Do you know you can run WhatsApp on multiple phones? Well, it’s not an Android-only tricks, but we had to cover it as it’s worth. In fact, you can use the same WhatsApp account across 4 companion devices and each acts as a standalone WhatsApp once you start using it.
You can make and receive calls and do pretty much everything you could on a secondary phone even if the internet access to the primary phone is cut off. I have two Android phones that I use parallelly. Let’s say I am going for a walk and cant carry both the devices.
All I need is internet access to my secondary phone and I don’t have to worry about whether I’ll receive messages or can make calls or not, because I can do it all. Unless WhatsApp Web, this technique lets you reap the full potential of running sake WhatsApp account on multiple devices.
If you have any iPhone friends, you must have seen them showing off how they can glide through a wall of text simply by sliding on the long space bar? Well, if that’s the case, Android offers a similar feature as well. In fact, I tried it on my Samsung Galaxy and it works splendidly.
All you got to do is write a text (or if you already have it, better), and then, long-press on the space bar and glide left or right to move the cursor. It feels rewarding to move the cursor like that rather than painfully selected the space between a particular piece of text only to realize you have clicked on the wrong text leaving no choice but to painstakingly repeat the process.
Well, well, well, this sums up our take on the five best Android tips and tricks we could list for this month’s edition. Of course, Android offers a lot of known and lesser-known shortcuts, tips, and customizations that could leave you bewildered, and we are here to list them out, five at a time, obviously.


Follow ZDNET: Add us as a preferred source on Google.
I’ve spent large portions of my life looking for ways to extend the battery life on my Android phones. Admittedly, that sounds rather dramatic, but growing up with only budget models meant I was constantly tweaking device settings to squeeze every bit of juice out of their batteries.
Thanks to this micromanaging, I successfully pushed the batteries on all my past smartphones to their absolute limit. I don’t want to hoard this knowledge to myself, so I’ve decided to share it with everyone.
Also: The best Android phones to buy in 2025
There are many different methods for saving battery life. However, there are 12 key settings that you can change right now to see improvements immediately. The following list highlights the most effective, easiest, and quickest tweaks to improve device longevity regardless of the Android phone you’re rocking, whether it’s the latest model from Samsung or a fancy Google Pixel. Plus, you won’t have to sacrifice the high-quality experience of using your phone.
Although the power settings are practically the same on every Android phone you can buy, the process for adjusting them can vary between devices. Be sure to keep this factor in mind when following the steps I lay out because the approach might be slightly different depending on the model you’re using.
One of the biggest battery drainers for any smartphone is the always-on display. Companies regularly tell you that this display setting only drains about 1% to 2% an hour, but let’s be honest — it’s always way more. It may be nice to glance at your phone while it sits on a table to check the time, but it’s probably not worth sacrificing battery life.
Also: How to factory reset your Android phone without unlocking it first
How to: Open the Settings app and locate the Lock Screen portion. You’ll likely find this portion in the main Settings list or under “Display.” From there, locate the option to “always show info” or a simple toggle to enable the Always On Display. Either way, turn the option off and check to make sure your screen goes completely blank when you lock it.
There’s a handy feature built into Androids called Adaptive Battery, and it’s available on most devices. Adaptive Battery can automatically manage your phone’s performance and efficiency in the background using special processes to extend your battery life. For example, when you don’t need maximum performance for something simple like scrolling through your inbox, the setting will throttle things down and save you some juice.
How to: Go to Settings > Battery > Adaptive preferences and check to ensure “Adaptive battery” is enabled. If it’s not, flick it on.
Alongside Adaptive Battery, Battery Saver mode is another helpful feature that can extend the longevity of your smartphone between charges. The feature makes sweeping changes across your device’s software, like limiting visual effects, restricting apps in the background, and turning on dark mode if it isn’t already on.
Also: I never travel without these universal chargers – and they can power laptops
Pixel phones take this effort further by having an Extreme Battery Saver, which deactivates more features and pauses most apps. However, because this option greatly restricts an Android phone’s performance, I recommend only using Extreme Battery Saver when it’s absolutely necessary, such as when the phone’s charge is in the single digits.
Most, if not all, Android phones possess a Battery Saver function, although they may have different names. On Galaxy phones, for example, it’s called Power Saving mode. Others may refer to it as low-power mode. Be sure to visit your phone manufacturer’s support website for help on your model.
How to: On Pixel phones, go to Settings > Battery > Battery Saver. You can also choose a schedule for when the feature will activate or turn off automatically. On Galaxy phones, go to Settings > Battery and Device Care > Battery. Flip the toggle switch next to Power Saving to activate the feature.
Over the past few years, many midrange and budget Android phones have followed their flagship brethren by adopting OLED displays. The technology allows individual pixels to dim or completely shut off when not in use. This feature is far more beneficial for battery life than traditional LCD screens with one big backlight. By switching to your phone’s dark theme, those pixels will be dimmer far more often and, in turn, save some juice.
Also: The best power banks you can buy in 2025: Expert tested and reviewed
How to: Go to Settings > Display on your Android phone. There, you’ll find the option to switch between a light and dark theme and to have dark mode turn on automatically at a certain time of day. I recommend keeping dark mode turned on all the time to maximize battery life.
It’s common knowledge that cranking down your display’s brightness can help save battery usage, but it’s worth repeating. Modern phones have plenty of brightness, and it’s sometimes unnecessary to have the brightness level so high when you’re only scrolling Instagram or checking your email.
Also, it’s important to shorten the time it takes for your phone to go to sleep. Users often set the sleep timer to a minute or more, which can drain your battery when you aren’t using your phone, and set it down on a table without locking it. Make these two adjustments, and you’ll be on the path to a better battery life.
How to: Swipe down once or twice from the top of your phone’s display to visit the quick settings menu. You’ll see a slider with a picture of a sun or other source of light next to it. Drag the slider to the left to decrease your brightness. To reduce the time it takes for your phone to sleep, go to Settings > Display and change “Screen timeout” to anything below a minute.
We’ve all done this at some point: you set up a new account for a social media app or email service (which you forget about) and then create another account that becomes your primary account for that service or platform. I’ve gone through this process numerous times.
If you set up accounts on your phone, all the old accounts remain, constantly refreshing and draining your battery life in the background. I highly recommend removing some old accounts from your smartphone sooner rather than later.
How to: Go to the Settings app and find the accounts section (on Samsung phones, it’s called “Accounts and backup,” while Pixel phones use “Passwords & accounts”). You’ll find a list of all the accounts synced to your phone. Tap on one of them and scroll down to the “Remove account” button. Tap it, and the account will disappear.
If you’re using your phone, chances are you’re typing on the keyboard pretty often, whether to post to social media or respond to your friend’s messages. If you have sound and haptic feedback enabled, your battery may suffer because your phone needs to make a series of vibrations and noises every time you tap a letter. Hearing and feeling the keyboard as you type is a nice experience, but it’s not ideal if you want to eke out some extra juice from a full charge.
Also: This keyboard case for my Android phone is the ultimate productivity tool – how it works
How to: Open the Settings app and locate “Language and input.” This section is where your keyboard settings live. Find the section where you get to choose your default keyboard, then tap the gear icon next to it to manage settings. If you’re a Gboard user (like most people), you’ll then go to Preferences > Keypress and disable “Sound on Keypress” and “Haptic feedback on Keypress.”
You might not realize it, but notifications can be one of the biggest drainers of your phone’s battery life. Not only is your phone buzzing and ringing all day, but the apps themselves are constantly refreshing in the background, looking for new notifications to send your way. Most apps have ways of limiting the amount of notifications you get, but the easiest way to turn them off is through your phone’s Settings app.
Also: Why I prefer this rugged Samsung phone over flagship models (and it looks just as good)
How to: Go to Settings > Notifications > “App notifications” to see a list of all the apps installed on your phone. Next to each entry are toggles that, when flipped, will disable all notifications for that particular app.
If your phone is constantly listening for you to say, “Hey, Google,” chances are your battery is draining away. Your microphone is active, waiting to hear you say those two magic words that trigger the digital assistant, and it takes a fair amount of energy to run that process all day. Disabling the feature is a no-brainer for anyone who doesn’t use the Assistant daily. And let’s be honest: how many of us use the assistant daily?
How to: Open the Google app on your phone and tap your profile picture in the top-right corner. Then, visit Settings > Google Assistant > Hey Google & Voice Match and flick off “Hey Google.” Now your phone will only trigger the Assistant if you hold down the power button or via another method.
Phone screens have gotten really good over the past few years, thanks partly to the faster refresh rates manufacturers have implemented. Whether it’s 90Hz, 120Hz, or even faster, increasing the times a screen refreshes helps make animations, scrolling social media, and everyday interactions feel smoother and more responsive. Unfortunately, a high refresh rate also means increased battery usage — you might sometimes be better off disabling the feature.
Also: I changed 8 settings on my Pixel phone to significantly improve the battery life
How to: Open the Settings app and navigate to the Display section. Here, you’ll find the settings to configure your refresh rate. Most smartphones call the feature something different; Google labels it “Smooth Display,” while Samsung calls it “Motion smoothness.” Find the setting associated with the refresh rate and revert to the standard rate. Your screen will likely seem a bit choppier as a result, but that’s completely normal. It simply means it’s operating at 60Hz, the speed at which even the best phones used to run a few years ago.
I’ve never been a proponent of turning off wireless features, such as Wi-Fi, Bluetooth, or location services, to save a phone’s battery life. So many apps and services rely on those connections that your Android experience can diminish quickly. However, if you don’t use anything that needs Bluetooth or don’t use your phone for GPS, it might be worth disabling some of these features to extend your battery life.
Also: I changed 10 settings on my Pixel phone for an instant performance boost
How to: On practically every Android phone, you can swipe down once or twice from the top to access quick settings. Here, you’ll find icons for Wi-Fi, Bluetooth, location, airplane mode, and more. Touch them once to turn them off, and touch them again to turn them back on. You can also control all these settings through the Settings app, although Quick Settings is the easiest way to access them.
Low-power mode can slightly differ from Android phone to Android phone, but the general premise remains the same. This mode disables some features in the background, limits how often apps are refreshed, lowers your screen brightness, reduces the refresh rate, and more to save battery life in a pinch.
How to: There are several ways to enable low-power mode on your Android phone, but the most common is swiping down twice from the top of your screen to get to quick settings and then tapping the battery shortcut. The shortcut should look like a battery with a plus sign or something similar. You’ll then get notified that low-power mode (or whatever it’s called on your phone) has been enabled. You can follow the same steps to disable this mode.


The influx of messages I get monthly is overwhelming. It’s mostly bank debits, one-time passwords (OTPs), promotional spam, and data usage warnings.
Sorting them on my mobile devices is a huge chore, and the nature of the texts doesn’t help. I would not have any issues if they were exciting texts from friends or family.
Those types feed my nostalgia. But they only come through WhatsApp and other social media channels. Google Messages is a reminder of bills and upcoming events I haven’t dealt with.
Lately, I’ve faced the clutter head-on and turned the app into an effective organizer. Here are my top tricks.
In group chats, I’ve developed a habit of tagging my own messages.
If someone drops a task or an update that I need to act on, I’ll reply underneath with a short tag like “to-do.”
Group chats are full of overlapping jokes and side comments. It might be tough to recall exact phrasings when searching later.
So, I search for my tag, and Google Messages pulls up every marked item. Sometimes, I try to weave it naturally into a sentence. For example, replying with “this just gave me an idea” instead of “idea.” It sounds less robotic and awkward.

I’m becoming less ashamed of talking to myself. It actually helps with memory and focus.
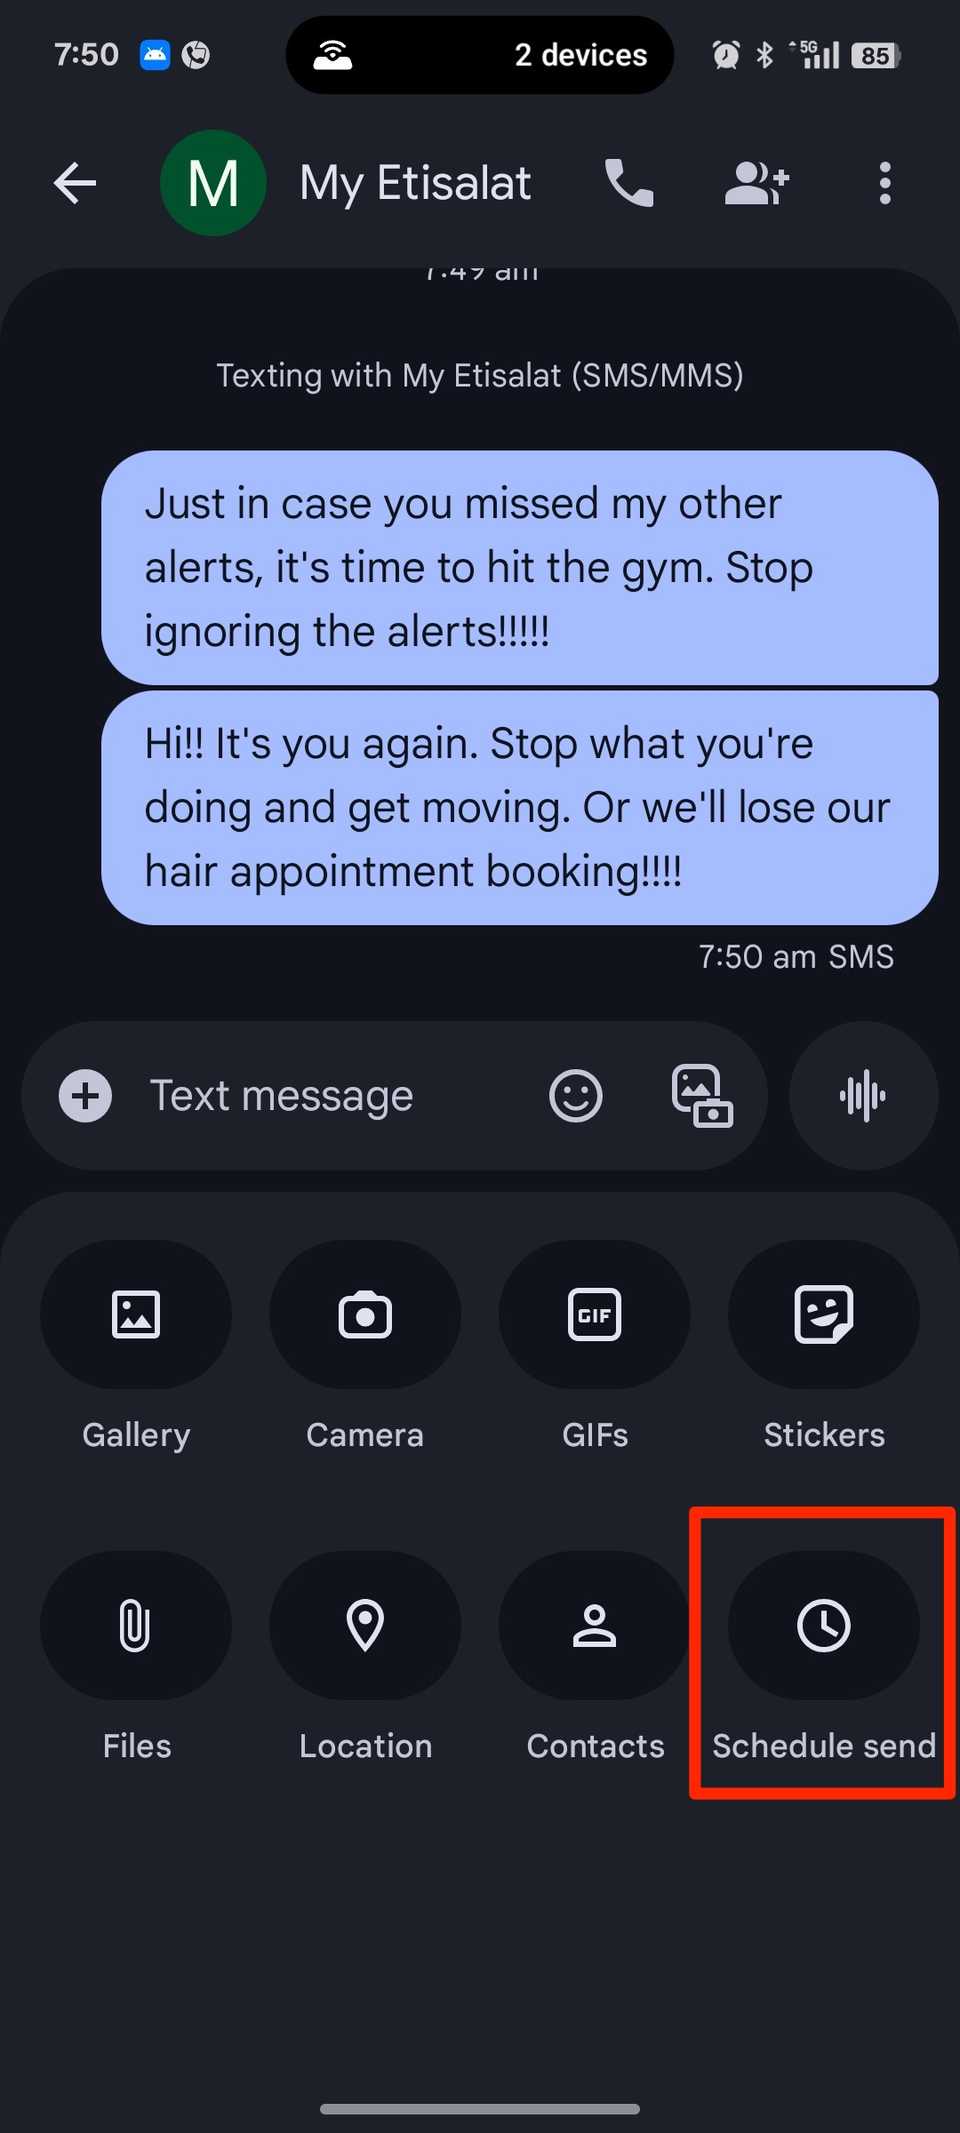
Likewise, I’m not afraid to text myself sometimes. Messages’ schedule tool has become one of my most useful organizational hacks.
I use time-delayed reminders that land exactly when I need them. I normally switch to my work iPhone during specific hours and put my Android on Do Not Disturb mode.
I exempt my other phone line from blocked contacts and appoint texts to it. It adds to my clock and calendar reminders to take a break, call someone, or run an errand.
The notification feels more urgent than a calendar alert because it arrives like a real text. Tap the + icon in the lower-left corner of the text box, then select Schedule send to get started.
Having loved ones abroad comes with emotions. Life overseas can feel lonely, and homesickness is common.
It’s surprising how relatives who move away treasure every call or message. My cousins don’t skip check-ins, and they genuinely love keeping in touch. So, I try to dedicate my time to them.
But such calls demand attention. Matching energy on both sides of the world is a task between juggling work and school.
On busy days, I schedule texts because of the difference in time zones. That way, they know I’m thinking of them. It’s better than planning a call that both parties will be too tired to commit to.
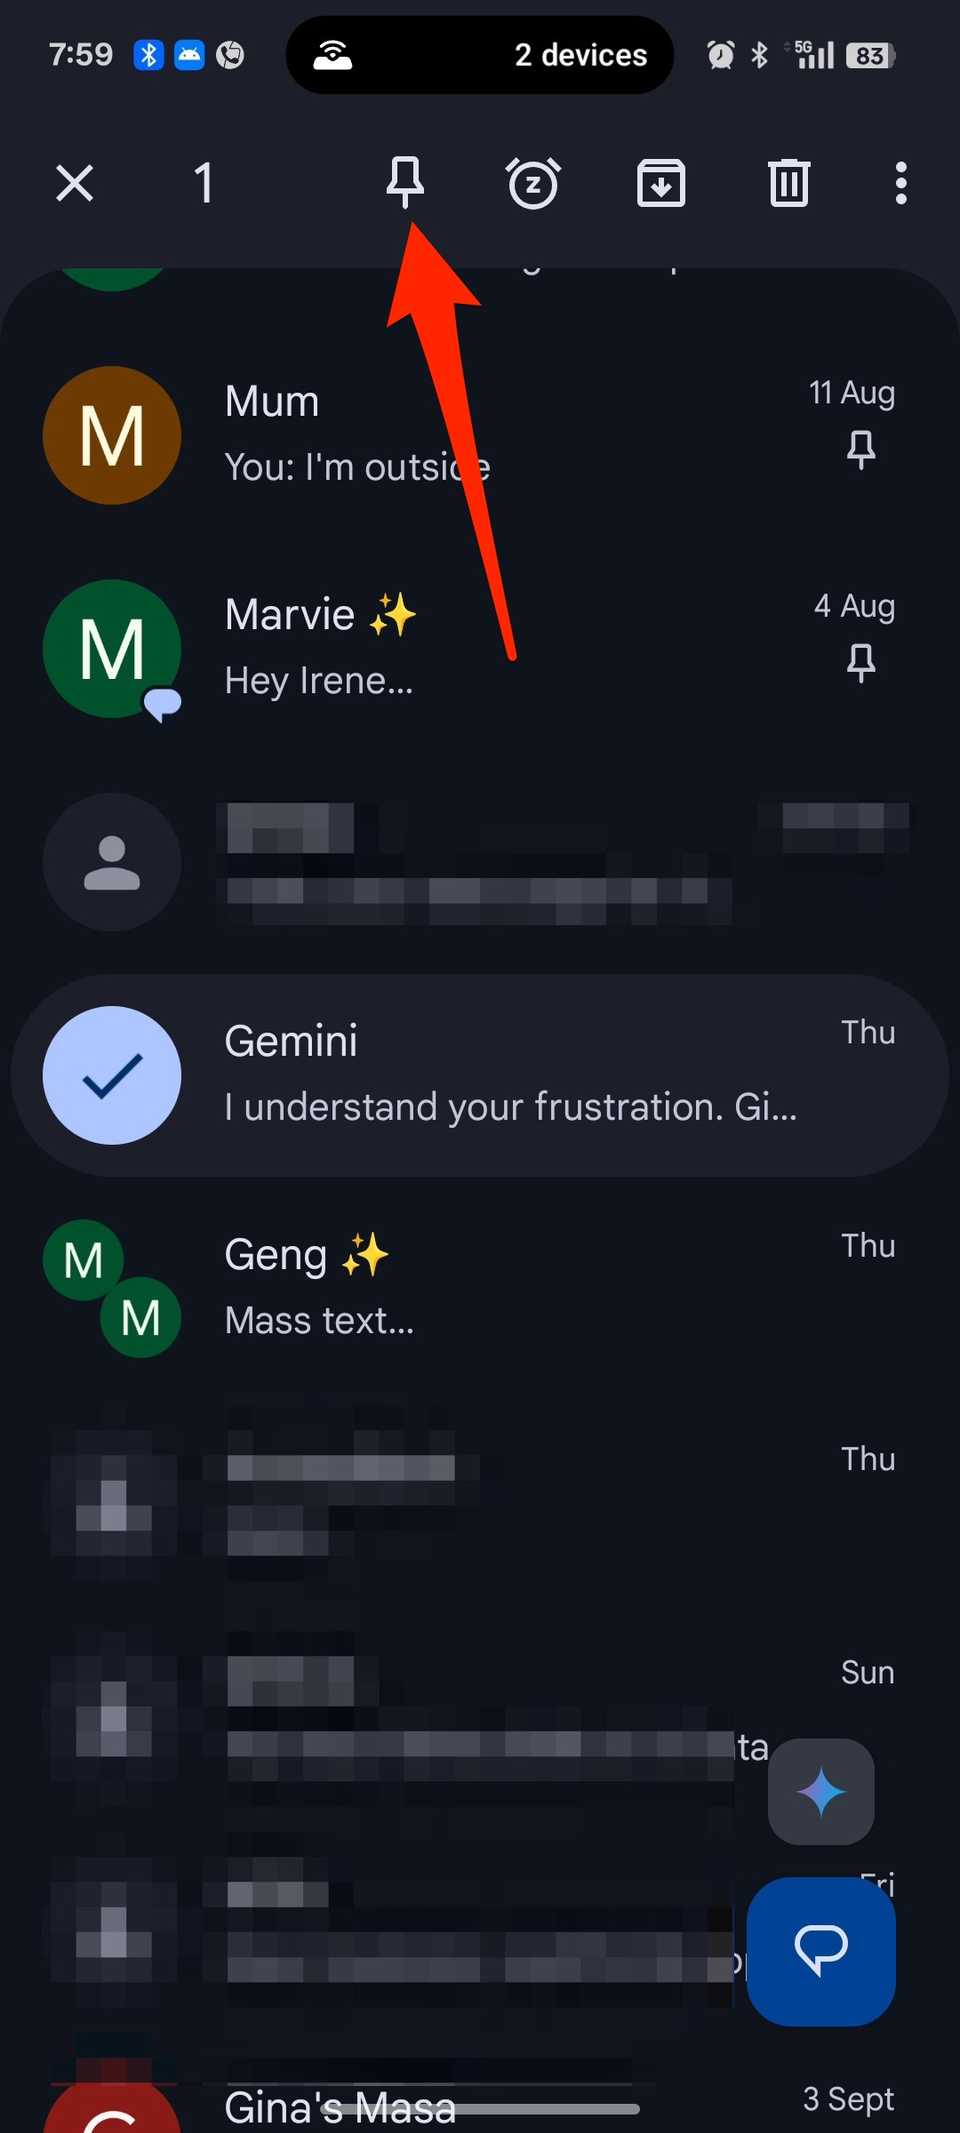
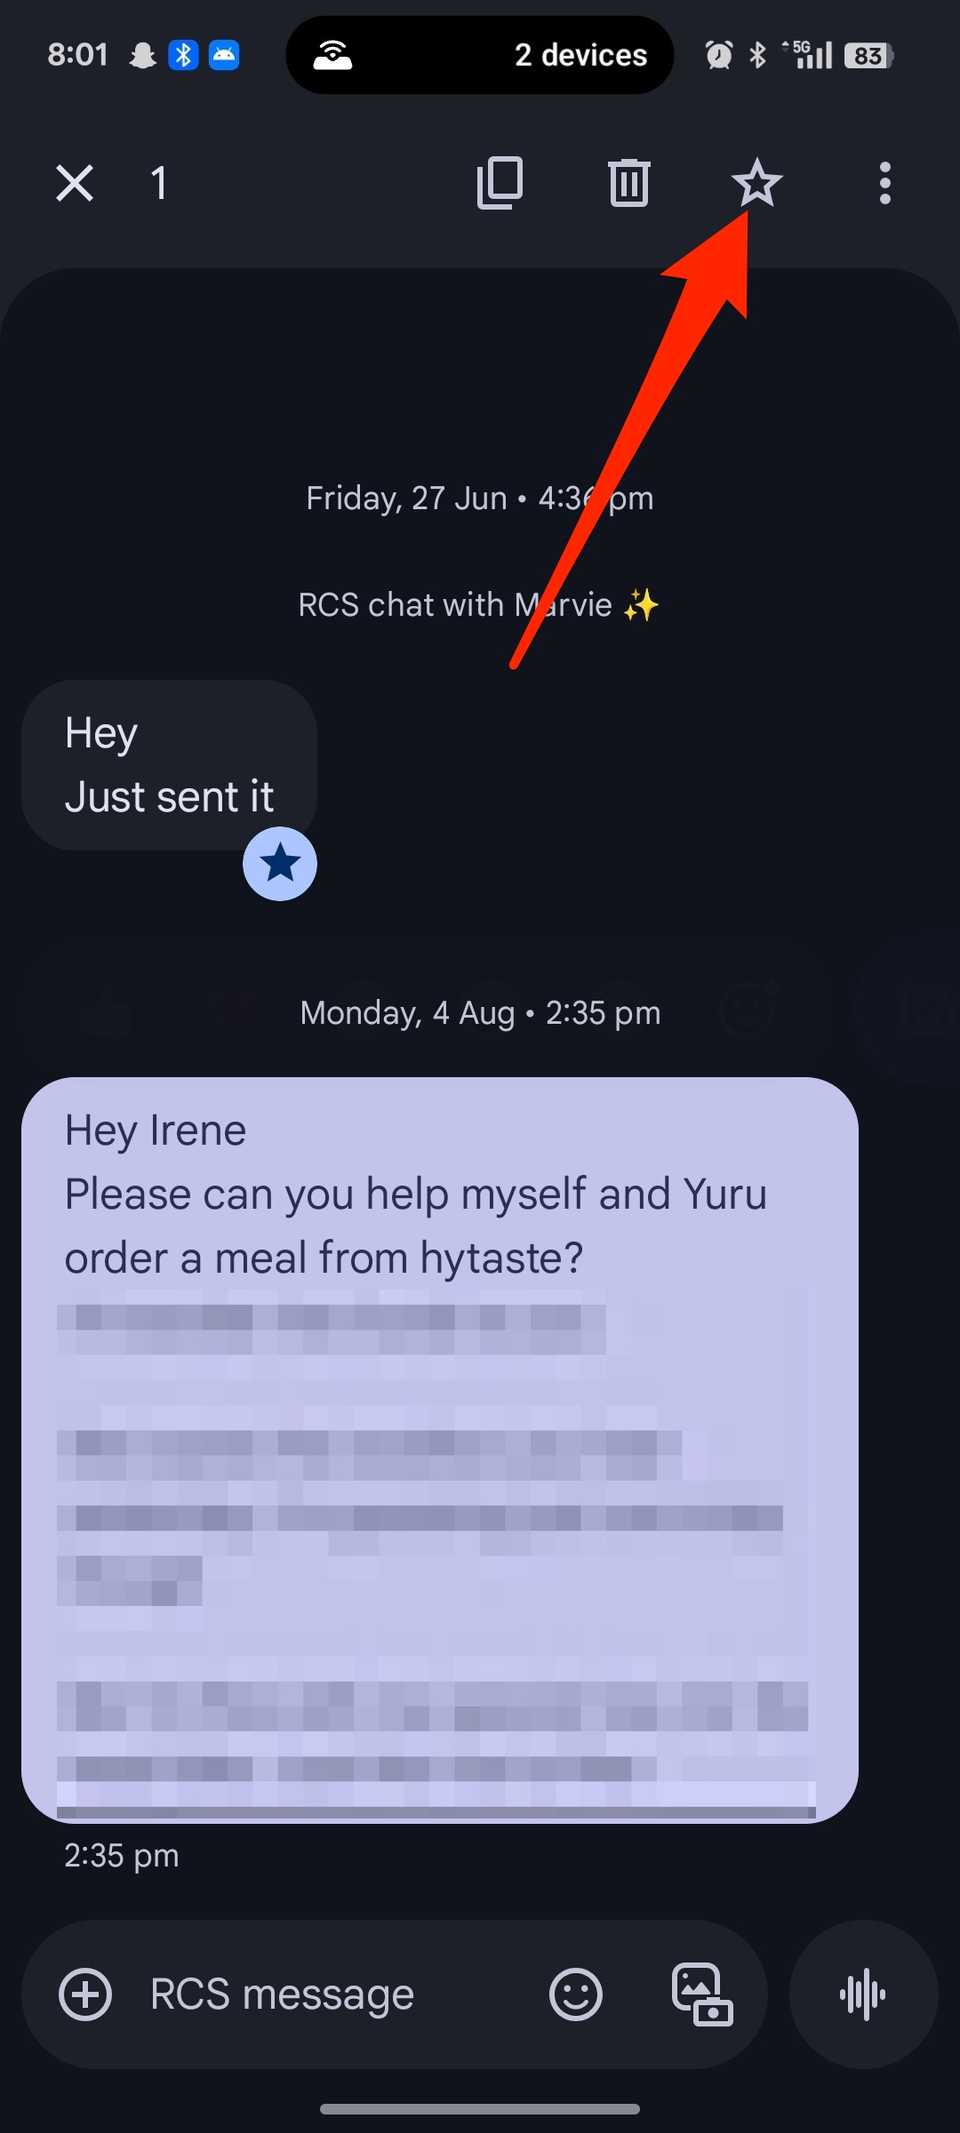
I pin entire chats I can’t afford to lose track of to the top of my inbox. My class and friend groups are always active.
The last thing I want is a series of OTPs pushing them down the list. I long-press the chats and tap the tack or pin icon to anchor them.
Texts within conversations can also get buried quickly. If I see something interesting or urgent, I’ll long-press it and tap the star icon in the upper-right corner. Then revisit it later through the search bar.
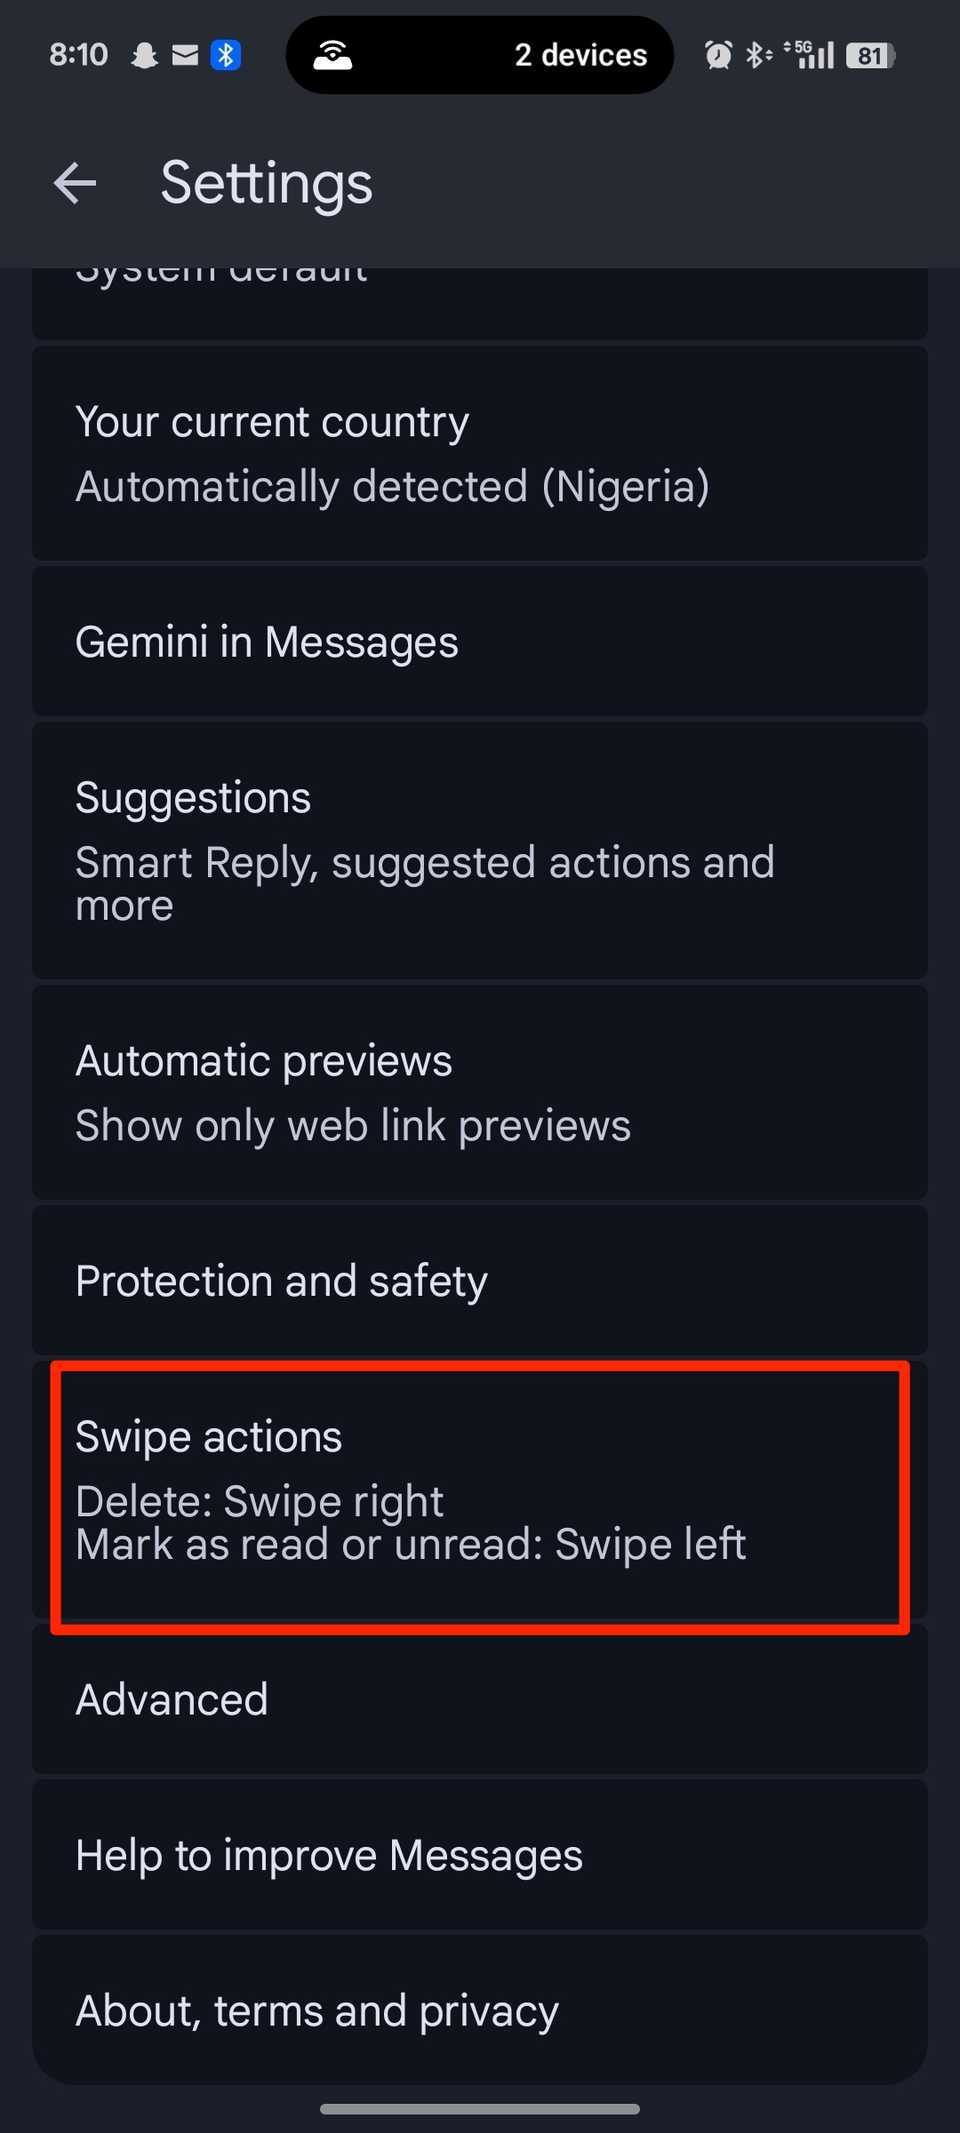
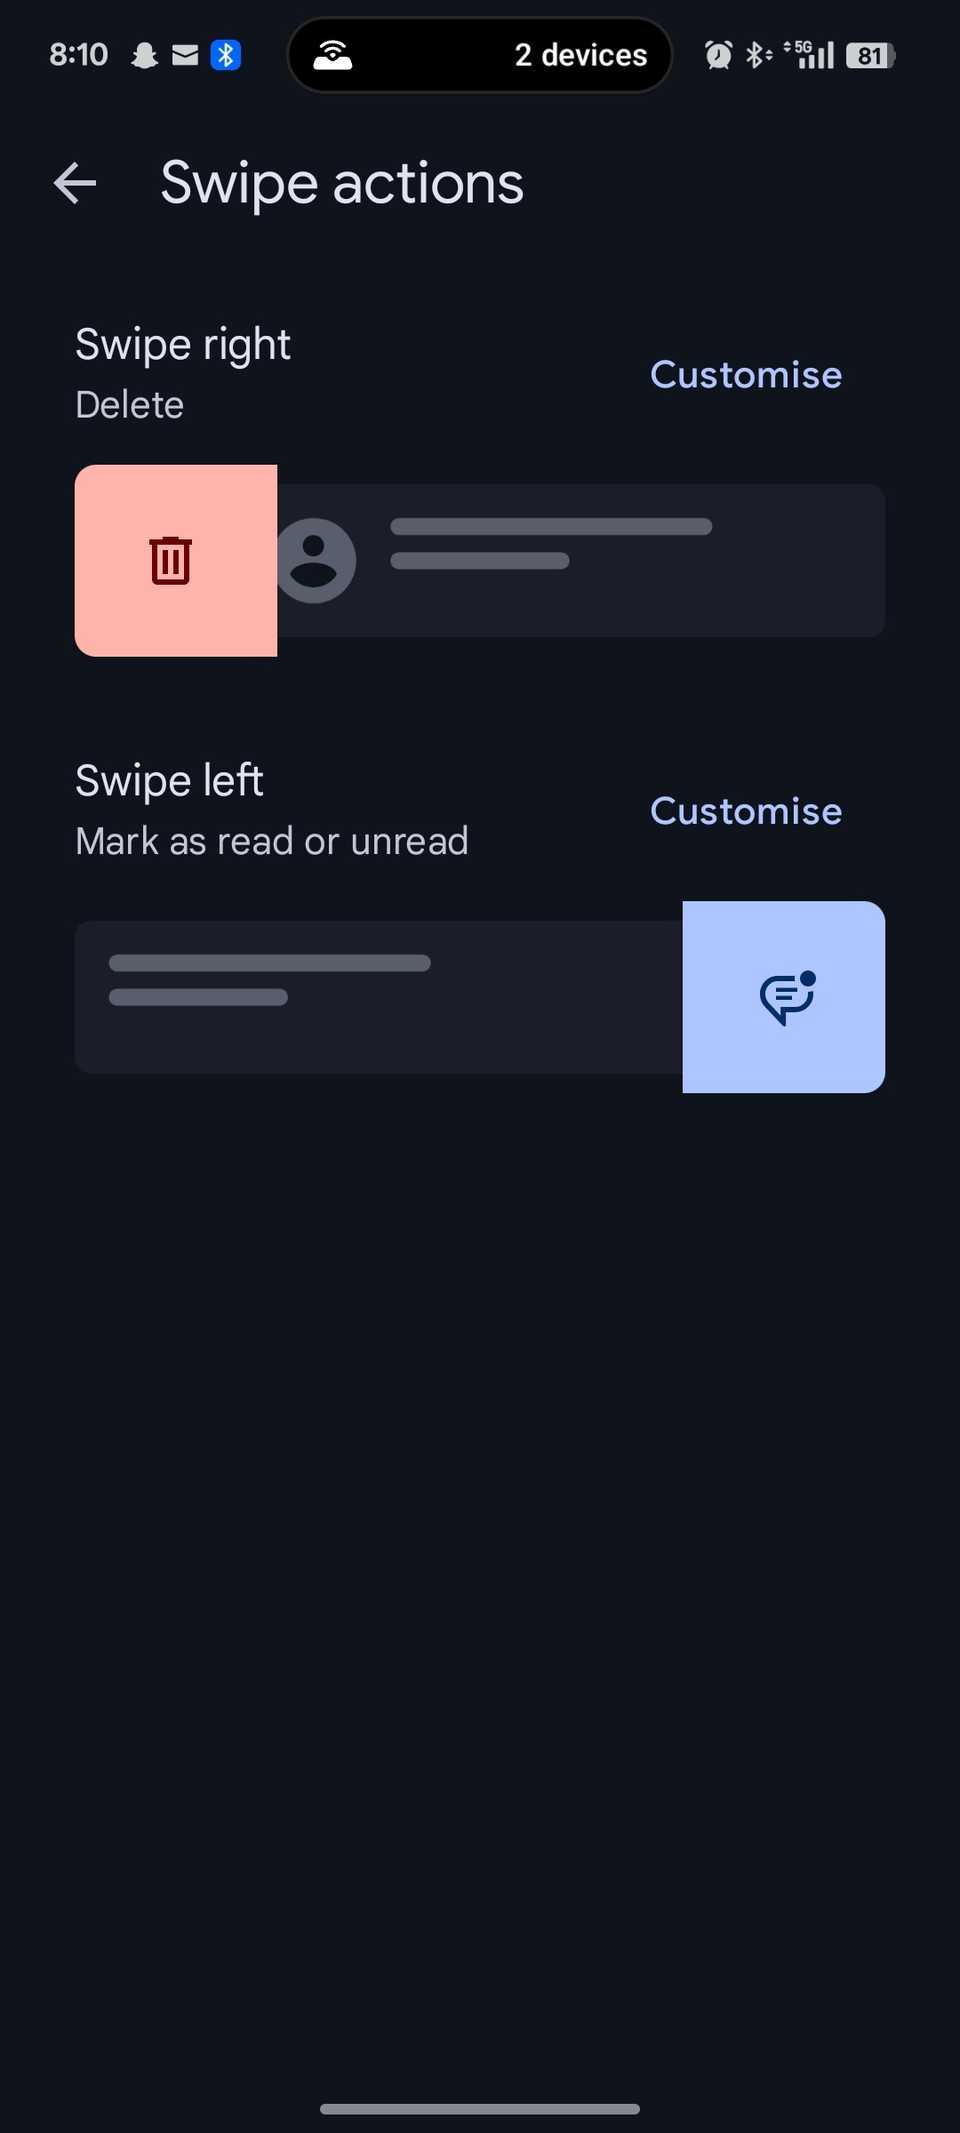
My most used actions on Google Messages are deleting and marking items as read. I hardly bother to read texts unless they’re from a particular contact.
I could allow them to pile up, then use the select feature to trash them. But I’d have to scroll and glance at each one and decide which one to keep.
Swipe actions help me deal with a message immediately when it arrives. I’ll choose which direction does what and save myself from notification floods.
To configure the actions, tap your profile icon in the upper-right corner. Go to Messages Settings > Swipe actions. Then choose what happens when you swipe left or right on a text.
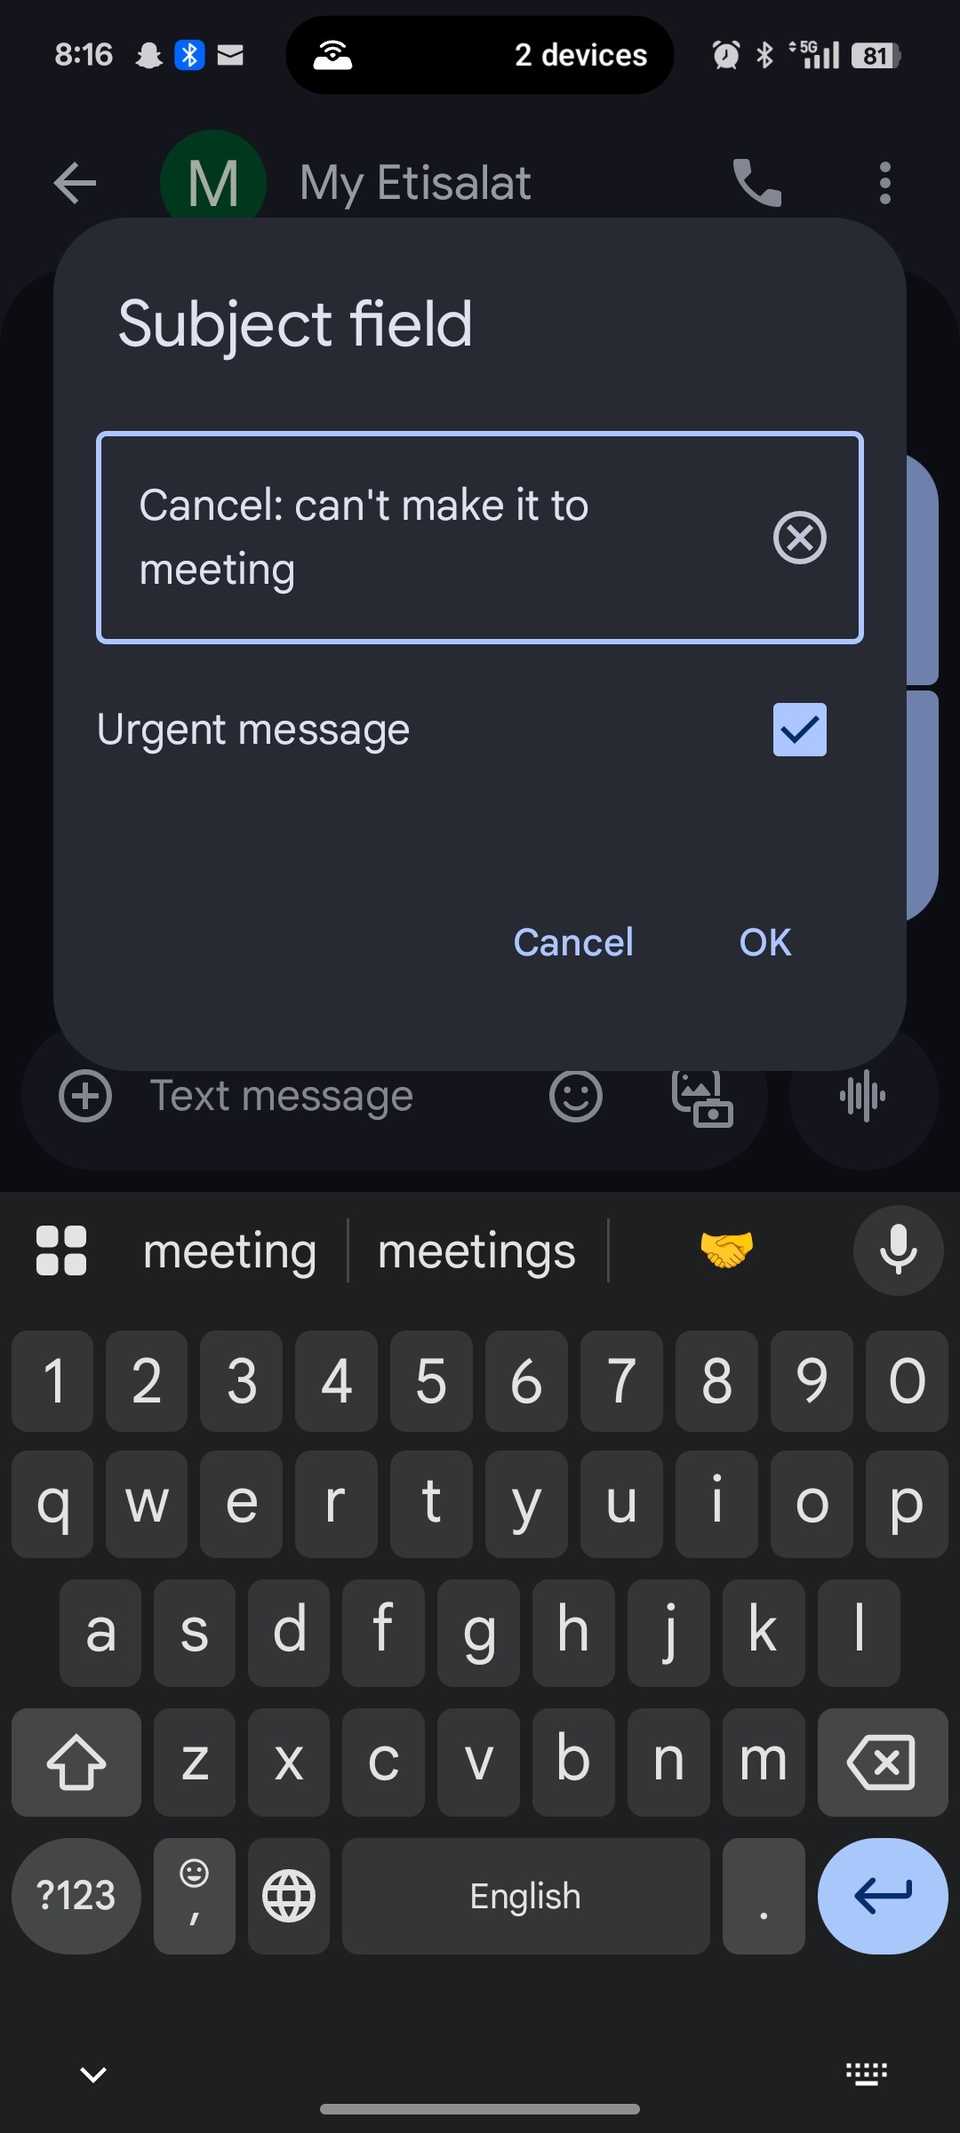
I dislike it when someone sends a “hey” or “hello” and waits for me to respond before they share what’s on their mind.
While I appreciate the greeting, it feels more helpful when people get to the point right away.
In the context of first-time greetings or emergencies, I value clear communication. I would respond faster when I know the full message upfront.
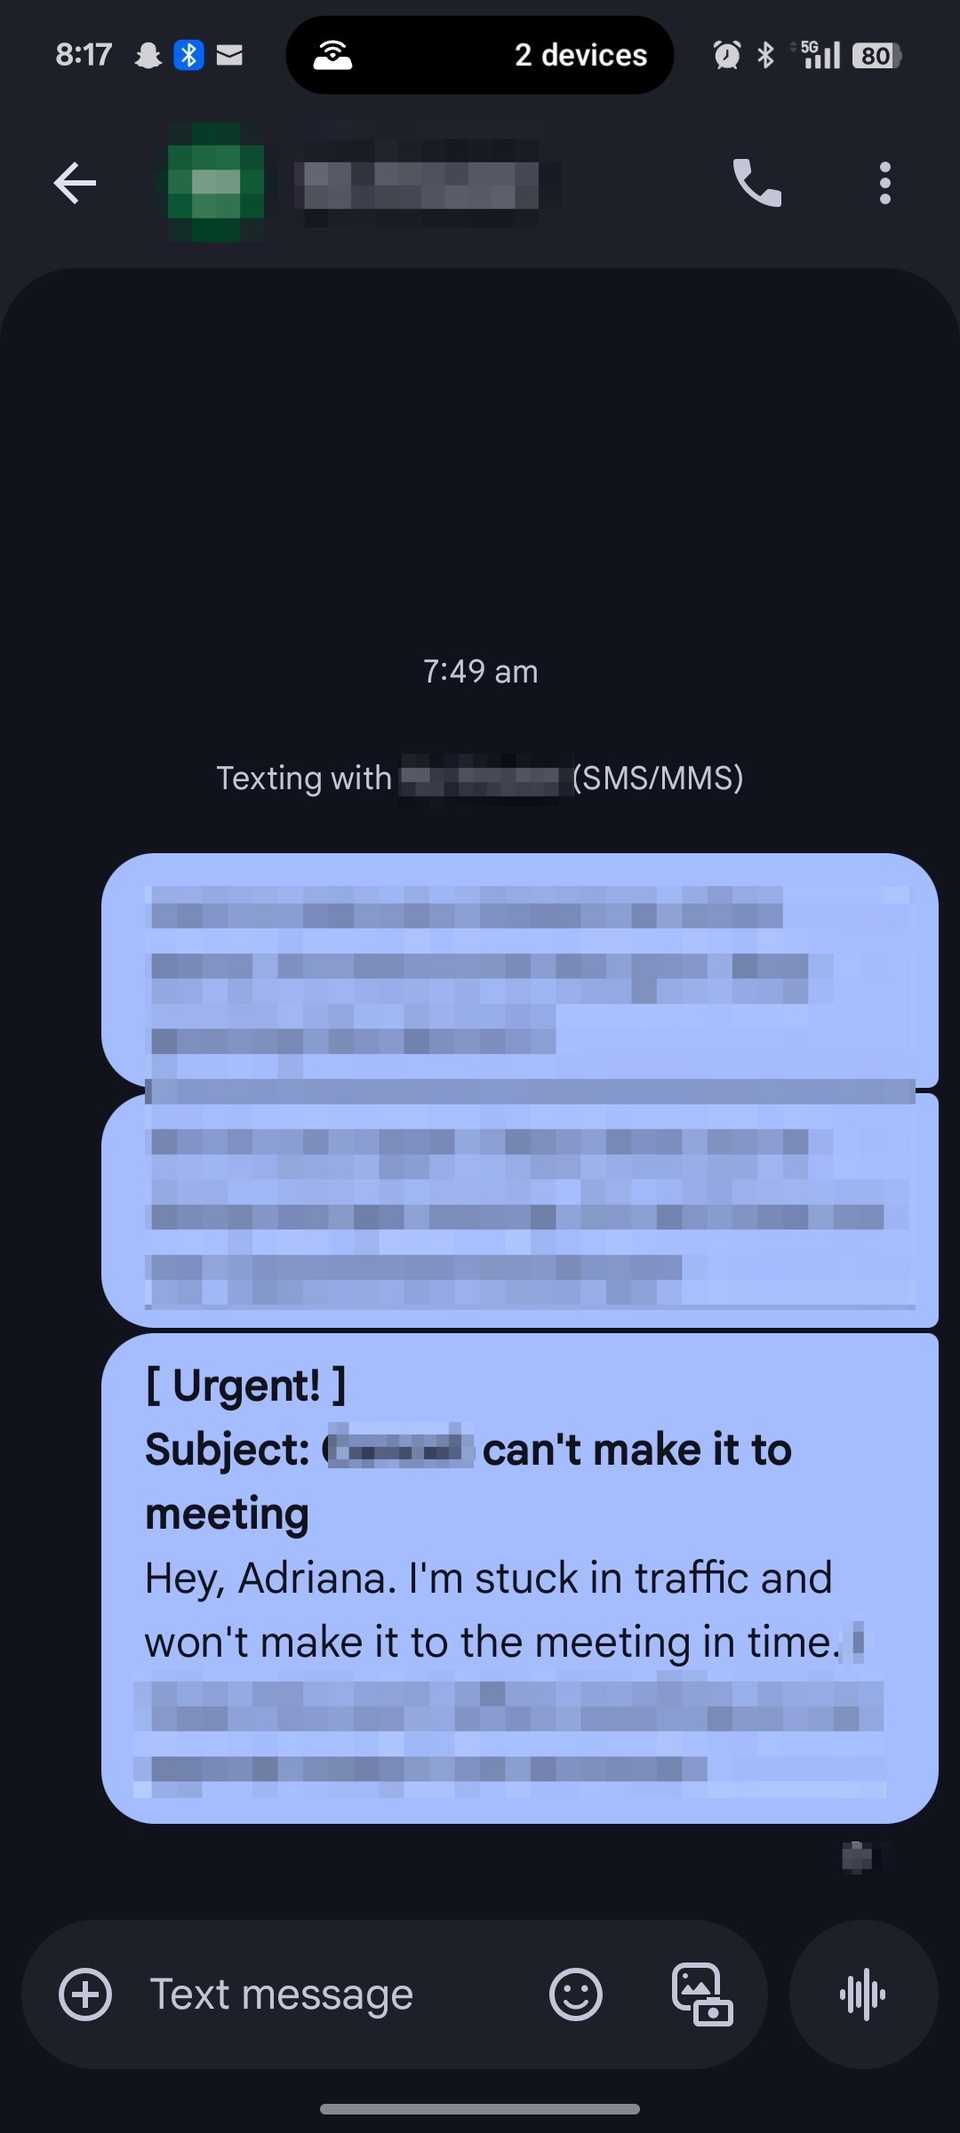
It’s the same principle that makes email subject lines useful. They give you hints about text content before even opening it.
The Subject field in Messages works similarly and allows you to mark texts as urgent. When composing a message, tap the three-dot icon on the conversation screen. Then select Show subject field.
Archiving old conversations isn’t anything new or mind-blowing. But it’s among Messages’ most useful tools. It tucks chats neatly out of sight. So, you don’t have to delete them permanently.
If you ever want to revisit your texts, visit the archive menu or take them back to the inbox.
My rule of archiving is that if a message doesn’t contain an ongoing discussion, a task I need to follow up on, or a contact I speak to regularly, I hide it.
If a conversation becomes active again, it reappears in the inbox without manual intervention.
I wish Google added a toggle to let you choose whether archived chats stay hidden or resurface like WhatsApp does.
It’s a missed opportunity to give users control of an important feature. But it’s not a dealbreaker. Long-press your preferred messages. Then tap the archive icon between the snooze and trash icons to begin archiving.
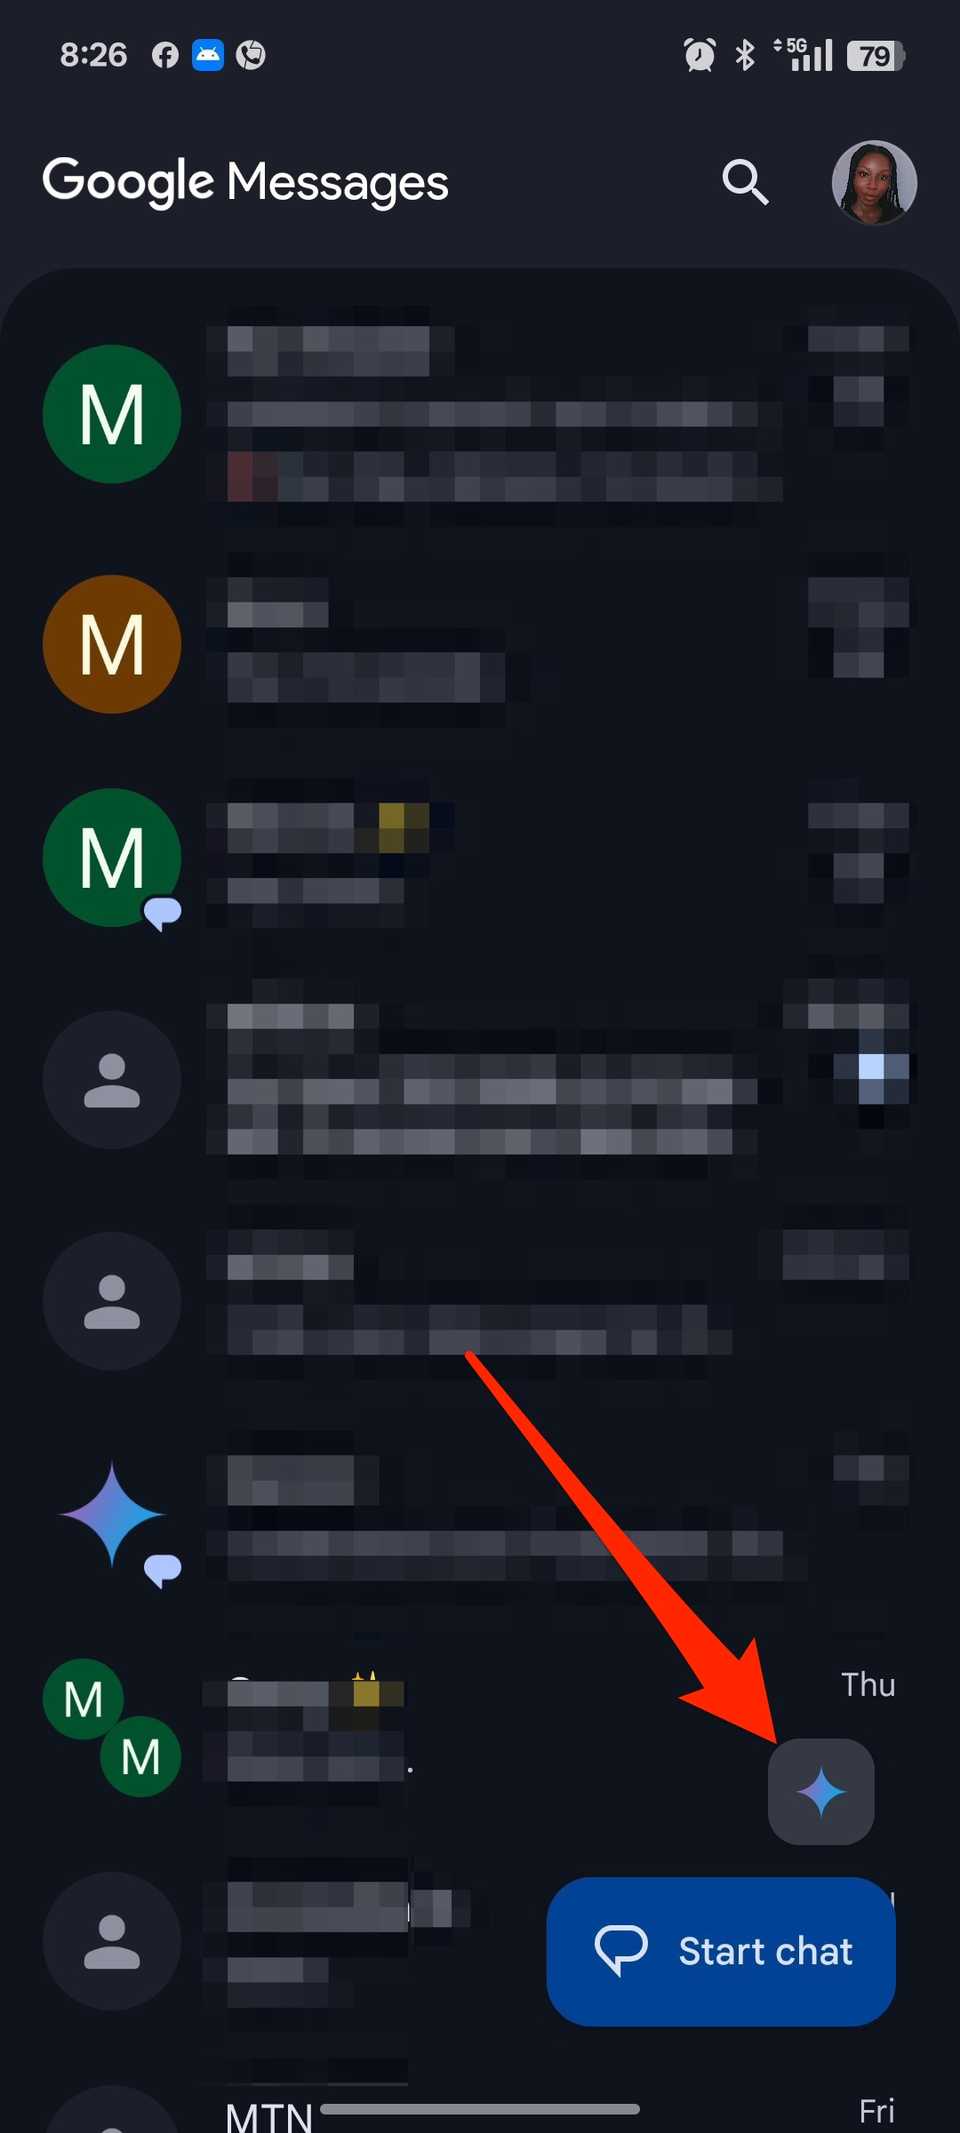
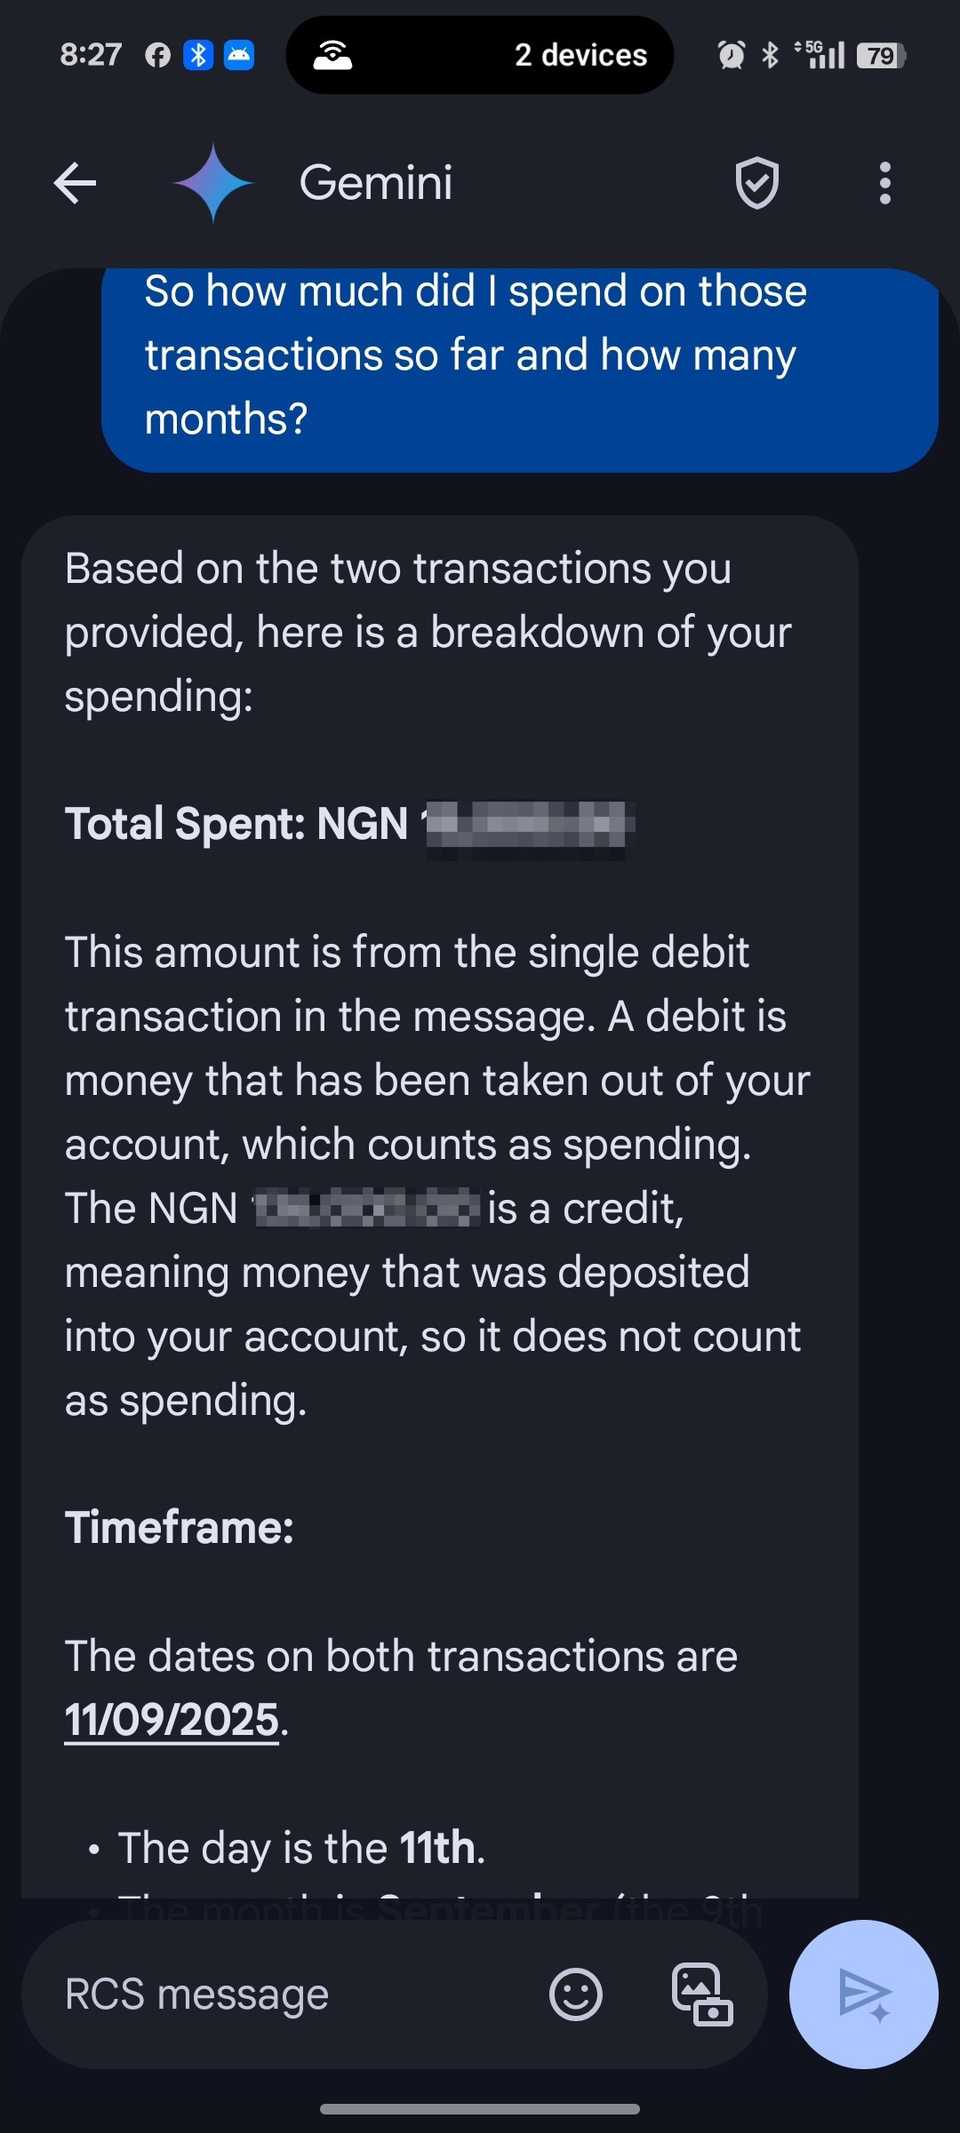
Google brought its clunky AI to Messages, but it still has its good uses. It can’t read your messages and automatically sort them. It can only process content you choose to share.
It assists with calculations and budgeting when I paste select debit alerts into it.
Again, it helps me reply to messages faster.
Writing is literally my job, yet there are days when I’m short of words. I prompt Gemini to make a template for messages I want to reply to. Then I refine and deliver the result in seconds.
Tap Gemini’s button in the lower-right corner to give it commands.
The shared features above aren’t even half of what Messages can do. Google has layered in much more to enhance communication.
Enable Rich Communication Services (RCS) to get typing indicators and high-quality media. OTP auto-deletion will wipe away your piling authentication codes within a day.
Device pairing is how I extend my texts to my laptop or desktop to keep conversations at all times. These features combined make texting on Android unbeatable.


Google Chrome and Firefox are solid web browsers, but the Chromium-based Edge can be an even better option if you want to stay in the Microsoft family. Since Edge’s unveiling, Microsoft has continually added new capabilities to turn its browser into a sleeker and smoother program than Internet Explorer.
Given Microsoft’s approach to generative AI, the company has integrated Copilot into the browser. With the AI accessible in a sidebar, you can submit requests and generate content without having to open the Copilot web page. To take advantage of Copilot and many other (often hidden) features in Edge, here are some of the best tips and tricks.
Microsoft adds new features to Edge all the time. While the updates arrive automatically, you may need to manually update your browser from time to time. To see the current version of Edge, click the ellipsis icon in the upper right, go to Help and Feedback and select About Microsoft Edge. Any available update will automatically be installed. Click Restart Edge to restart the browser and use the latest version.

(Credit: PCMag / Microsoft)
To use Copilot directly in Edge, click the Copilot icon at the upper left. A sidebar opens with full access to Microsoft’s AI. You can choose one of the suggested topics or submit your request. You’ll be able to ask Copilot to generate an image, upload certain types of files for analysis, and view a history of your conversations. To turn off the Copilot sidebar, just click the icon again.

(Credit: PCMag / Microsoft)
Microsoft Edge lets you store your favorite websites as favorites. Open the page you wish to save, then click the star icon in the Edge toolbar. From the Edit favorite menu, you can rename the page and even add it to a specific folder to better organize your favorites. When ready, click Done to put it in your Favorites list.

(Credit: PCMag / Microsoft)
As a Chromium-based application, you can enhance Edge with extensions from the Microsoft Store and the Chrome Web Store. Start looking by clicking the puzzle piece Extensions icon on the top toolbar of the browser and select Manage extensions from the menu. Here, you can manage all your existing extensions. Click Get Extensions for Microsoft Edge in the sidebar to view add-ons in the Microsoft Store. To install a specific extension, select Get > Add extension.

(Credit: PCMag / Microsoft)
To install extensions from the Chrome Web Store, you’ll need to enable the Allow extensions from other stores option on the Manage extensions screen. Click the Allow button to confirm. You can then browse the Chrome Web Store. Select an extension, click Get, and choose the Add extension button.

(Credit: PCMag / Microsoft)
Edge lets you create your own collections of web pages, text snippets, and images. This can be helpful if you’re conducting research or looking for specific information and want to gather all the related content. To start a new collection, click the ellipsis icon, select Collections from the menu, then click Start new collection. Name the collection and then click Add current page to add it.

(Credit: PCMag / Microsoft)
Next, you can send a collection to Microsoft Office apps Excel, Word, and OneNote, as well as Pinterest. Click the ellipsis icon and choose a destination. Using this menu, you’re also able to open all the content in the collection or copy it to the clipboard.

(Credit: PCMag / Microsoft)
The next time you want to access one of your collections, go to the Collections pane and select the grouping you wish to view. You can create new collections, edit existing collections, delete individual items in a collection, or delete an entire collection.

(Credit: PCMag / Microsoft)
Sometimes Edge can get cluttered with too many pages, tabs, and favorites, especially if you’re juggling multiple projects and tasks. To better organize your online activities, you can create individual workspaces. Each workspace can contain its own unique tabs and favorites. To get started, click the Workspaces icon in the upper left (the one that looks like three overlapping squares) then select Create new. Name your workspace, assign it a color, then click Done.

(Credit: PCMag / Microsoft)
Any pages, tabs, or favorites you access will be specific to your current workspace. You can also invite people to share and collaborate on a group of tabs within the workspace. To manage it, click the workspace name in the upper left. From the menu, you’re able to invite people to use it, edit it, delete it, or create a new workspace.

(Credit: PCMag / Microsoft)
You can more easily manage a website by using Microsoft Edge to turn it into an app. By doing this, you’re able to pin the site to your desktop or Start menu. In some cases, you can also use the site when you’re offline. To set this up, open the site and click the ellipsis icon on the top toolbar. Go to Apps > Install this site as an app, then name the app and click Install to open the site in a separate window.

(Credit: PCMag / Microsoft)
To manage websites that have been installed as apps, click the ellipsis icon, select Apps > Manage apps, then right-click on the site you wish to manage. You can then open it in Edge, view site permissions, pin it to the Desktop or Start Menu, or uninstall it as an app.

(Credit: PCMag / Microsoft)
Do you frequently visit a particular web page? Instead of going through the hassle of opening Edge each time you want to access that page, just save it to the Windows Taskbar instead. To set this up, click the ellipsis icon, go to More Tools > Pin to Taskbar, then name the site and click the Pin button to make the website appear on your Taskbar.

(Credit: PCMag / Microsoft)
Are your open browser tabs hard to navigate? Edge offers a vertical tabs feature that lets you see open tabs in a list format. To try this, click the Tabs action menu icon in the upper left and then select Turn on vertical tabs. Edge opens a sidebar on the left with all your tabs listed.

(Credit: PCMag / Microsoft)
Having too many tabs open can slow down your browser. With the sleeping tabs feature, you can tell Edge to stop using system resources on pages that have become inactive. To set this up, click the ellipsis icon, go to Settings > System and performance, then scroll to the Optimize performance section. Find the Put inactive tabs to sleep after the specified amount of time option and use the drop-down menu to choose a time between 30 seconds and 12 hours.

(Credit: PCMag / Microsoft)
You can customize the Edge sidebar and add quick access to specific websites and apps. To set this up, select the Copilot icon in the top left, then the plus (+) icon. From the Customize sidebar window, select Add current page to add the current web page or use the search bar to find another page to add. From the Apps section, you can set which apps should be in the sidebar. When done, click the Copilot icon to turn off the sidebar.

(Credit: PCMag / Microsoft)
You can also choose which icons should appear on the browser’s toolbar. At the Appearance screen, go to the Select which buttons to show on the toolbar section and turn on the switch for any feature that you’d like added to the toolbar.

Get Our Best Stories!
Thanks for signing up!
Your subscription has been confirmed. Keep an eye on your inbox!

(Credit: PCMag / Microsoft)
Sometimes you want to read an article but find the layout uninviting. You can fix this by turning on Immersive Reader, which reformats the page so the content looks like a virtual book or magazine article. To use this feature, the website must support the format. To turn it on, click the icon with the ellipsis in the circle that appears in the Address bar and select Immersive reader. The layout changes to remove ads and other distractions to help you focus on reading. Click the icon again to turn it off.

(Credit: PCMag / Microsoft)
If you often read PDFs and ebooks on your Windows PC or tablet, here’s a trick you’ll enjoy. Open a PDF or ebook in Edge and press F11. The page jumps into full-screen mode so you can read without the distraction of the top toolbars and browser menu. When finished, press F11 again to exit full-screen mode.

(Credit: PCMag / Microsoft)
If you prefer the audiobook experience, you can have Edge read a PDF, ebook, or web page to you. Right-click anywhere on the screen and select Read Aloud to have Edge start reading the book with its text-to-speech feature. Click the Voice Options button on the toolbar to change the voice and control the reading speed.

(Credit: PCMag / Microsoft)
Edge gives you the ability to manage and delete cookies. Click the ellipsis icon, the select Settings > Cookies and site permissions > Manage and delete cookies and site data and click See all cookies and site data. From this menu, you can view each individual site that has stored cookies. Select the down arrow for any site you don’t want to keep and click the trash can icon to delete the cookies.

(Credit: PCMag / Microsoft)
Edge offers a password monitor to alert you about compromised logins and a password generator to suggest strong passwords for new accounts. To use these features, click the ellipsis icon and go to Settings > Profiles and make sure your account is set to sync. To use the password monitor, scroll to the Microsoft Wallet section and click Passwords > Settings, then turn on Show alerts when passwords are found in an online leak to be notified if a saved password is ever leaked in a data breach.

(Credit: PCMag / Microsoft)
To use the password generator, turn on Offer to save passwords. The switch for Suggest strong passwords should then turn on as well. The next time you’re at the screen to create a new account for a website, click in the password field. Edge should suggest a strong password. If you don’t like the generated password, click Refresh until you find a password you do like. Select it to add the password to the field.

(Credit: PCMag / Microsoft)
Microsoft has built many privacy options into Windows, so it makes sense that Edge would have its own as well. The browser provides three privacy levels to help stop online trackers from monitoring your activity and collecting information about you for targeting ads. To customize this feature, head to Settings > Privacy, search, and services. Under the tracking prevention heading are three levels: Basic, Balance, and Strict.
If you want to tighten your privacy as much as possible, you may want to choose the Strict option. However, this can prevent full functionality on some websites, so using Balanced may be a better choice if you run into any issues. After selecting your preferred option, review the other settings here to view blocked trackers, add exceptions to the blocking, and clear your browsing data.

(Credit: PCMag / Microsoft)
From the same Settings screen, you can block different types of security threats. To tighten your security, turn on the switches for the following options: Scareware blocker, Microsoft Defender SmartScreen, Block potentially unwanted apps, and Website typo protection.

(Credit: PCMag / Microsoft)
To further control your online safety, scroll down the screen and you’ll see that Edge offers two levels for its security features: Balanced and Strict. You may want to start with the Strict level and then switch to Balanced if you run into any hiccups.

(Credit: PCMag / Microsoft)
Edge uses the DNS provider that is set up by your ISP, unless you change it. For greater security or privacy, some people like to use an alternative DNS provider such as Google, OpenDNS, or Cloudflare. You can easily change your DNS server if you wish. Under the Security section, make sure Use secure DNS to specify how to look up the network address for websites is enabled. Click Choose a service provider, then click the text field and select a provider from the pop-up list.

(Credit: PCMag / Microsoft)
Microsoft uses its own Bing search engine as the default way to search on Edge. If you prefer Google, DuckDuckGo, or another search engine, you can set a new default. On the Settings screen, select Privacy, search, and services > Address bar and search, then click the drop-down menu next to Search engine used in the address bar and change it to your search engine of choice. Don’t see your favorite listed? Click Manage search engines and type its name and URL to add it.

(Credit: PCMag / Microsoft)
By default, Edge opens to display a start page that serves up a news feed of top stories, but you can change the page. Go to Settings and select Start, home, and new tab page. For the start page, you can open a new tab, continue where you left off, or open a specific page. If you want a specific page to open, click Add a new page and enter its URL. More than one page can be added this way, each opening in a separate tab. You can also opt to see all currently open tabs upon startup.

(Credit: PCMag / Microsoft)


So you just got your brand new Google Pixel 10. Congratulations! It’s an incredible piece of hardware, and you’re probably itching to download your favorite apps, sign into your accounts, and start snapping photos.
Before you dive in, though, a handful of settings can drastically improve your day-to-day experience. Unfortunately, for one reason or another, Google leaves them turned off by default. Changing these settings can do everything from improving your battery’s long-term health, saving you storage space, organizing your home screen, and making sure you never miss an important notification again.
Whether you’re a long-time Pixel fan, a seasoned Android user coming from another brand, or switching from iPhone to Android, this guide will walk you through the essential first tweaks. I’ve been using Pixel phones for years, and I have a list of settings I change every single time I unbox a new one. I’ve updated my personal checklist for the exclusive features on the Pixel 10 and Pixel 10 Pro, and now I’m sharing it with you.
Some of these are fundamental Android settings that I think everyone should use, some are clever features exclusive to the Pixel ecosystem, and a couple are powerful new tools available only on the Pixel 10 Pro models. So let’s dive in and get your new phone tuned to perfection.

Google Pixel 10
New optical zoom camera
Long-term updates
Loaded with Google AI features

Google Pixel 10 Pro
Top-tier specs with small display
Excellent cameras
Powerful AI tools
Top-notch software

Google Pixel 10 Pro XL
Biggest non-folding Pixel phone
Best specs and AI features
Ryan Haines / Android Authority
Android’s notification system is, without a doubt, one of the best things about the entire operating system. It’s powerful, customizable, and miles ahead of the often-chaotic system you’ll find on iOS. However, it’s not perfect. We’ve all been there: a flood of notifications comes in, and in a rush to clear them, you accidentally swipe away something important. Maybe it was a message from a friend, a shipping update for a package, or a security alert from your bank. Once it’s gone, it’s gone. What do you do?
Never worry again about accidentally swiping away an important alert.
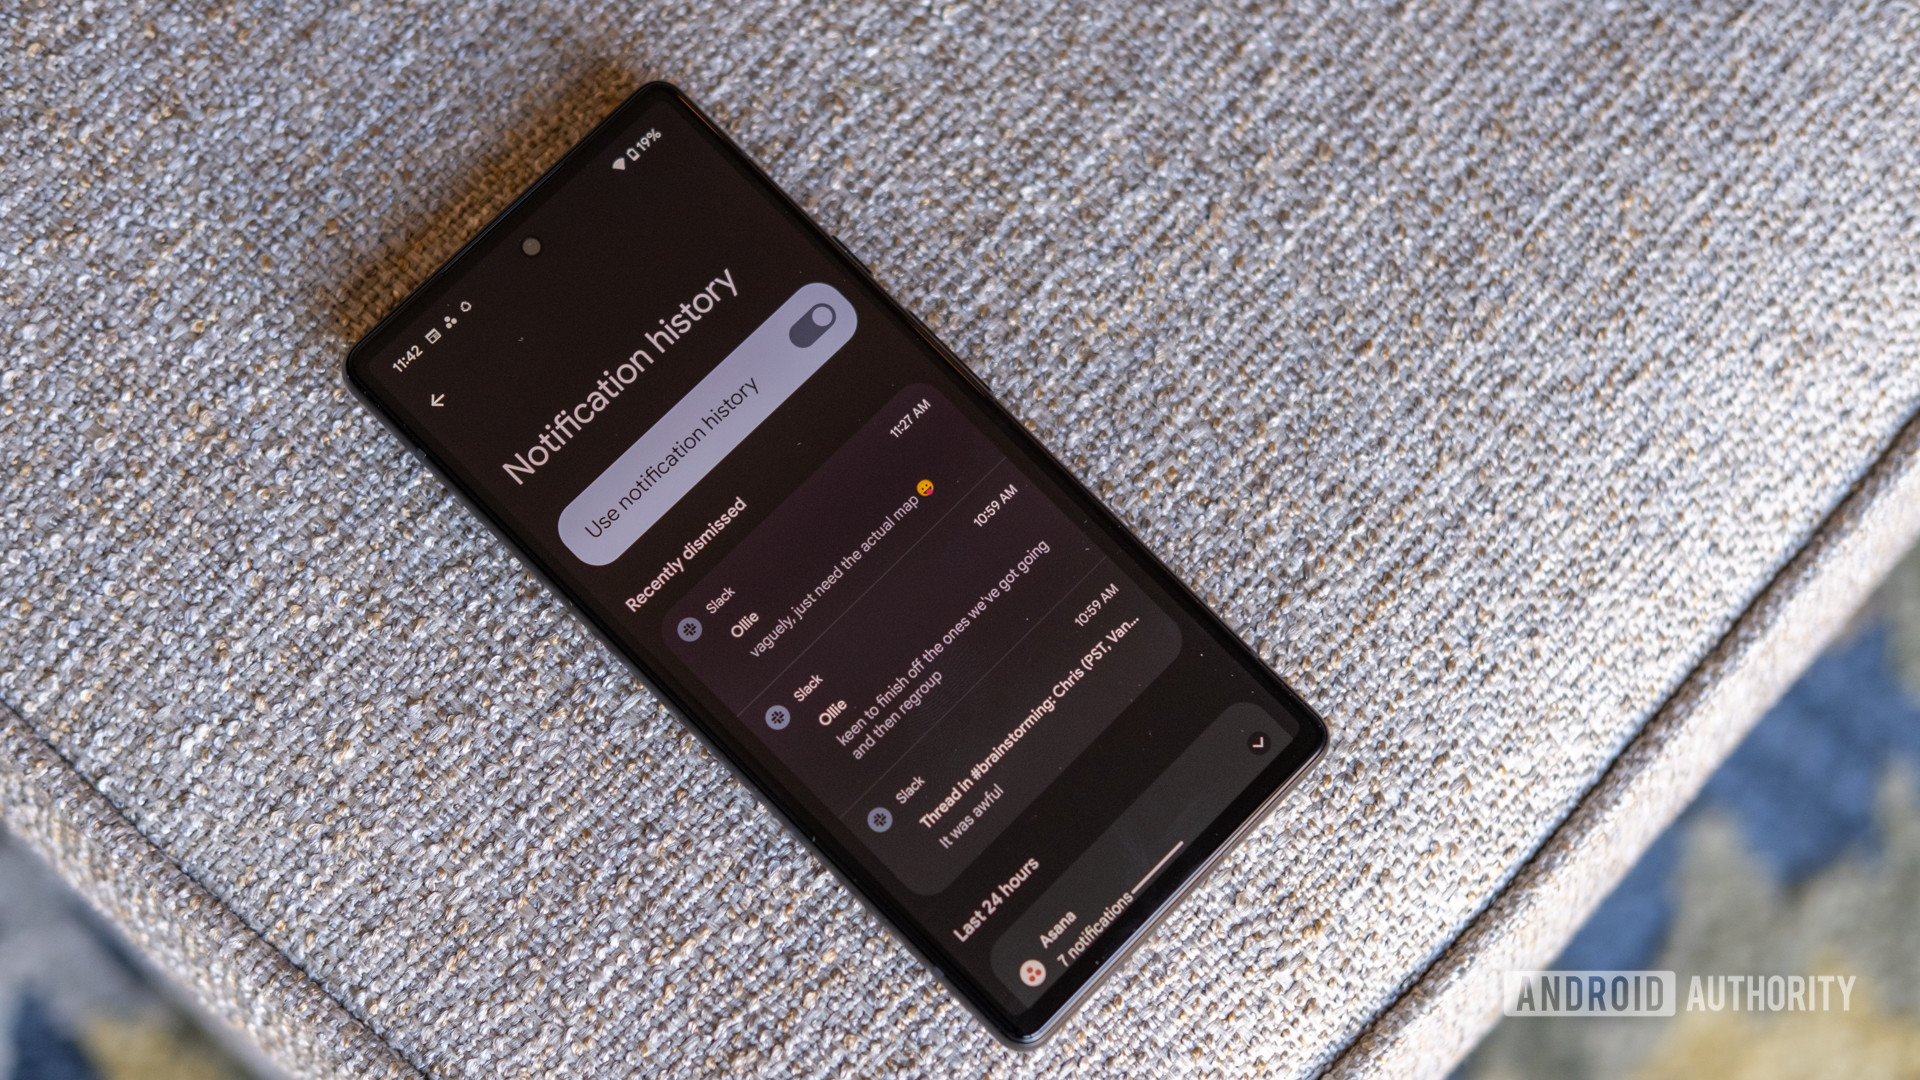
This is precisely why one of the very first settings I enable on any Android phone is Notification History. It’s a simple but incredibly powerful feature that acts as a log for every single alert your phone receives. Turning it on is a lifesaver.
To activate it, follow these simple steps:
That’s it. From now on, a complete record of all your notifications will be kept right here. If you ever accidentally dismiss something, you can just come back to this screen and see exactly what it was.
There’s also a nifty bonus to this feature. The history log doesn’t just show the notifications that appeared in your drop-down shade; it shows all of them, including the silent ones that apps often use to run processes in the background. This makes it a fantastic diagnostic tool. If you ever notice your battery draining faster than usual, you can check your Notification History to see if a specific app is constantly pinging your phone with silent alerts. It’s a great way to identify and rein in misbehaving apps that might be draining your battery without you even realizing it.
Aamir Siddiqui / Android Authority
With the Pixel 10 series, Google has fully embraced its latest design language, Material 3 Expressive. One of the most noticeable changes this introduces is an updated status bar. While it looks clean and modern (and a bit like iOS), the default battery icon at the top of the screen isn’t as helpful as it could be. It gives you a vague visual idea of how much charge you have left, but it’s hard to tell if you’re at 40% or 25% with just a quick glance. For those of us who like to know the precise number, there’s an easy fix.
The battery icon in your status bar is pretty vague about how much juice you have left, but we can make it better.
You can add a percentage display right inside the battery icon, giving you an exact reading without taking up any extra space in your status bar. Here’s how:
Instantly, you’ll see the number appear inside the icon, giving you a much clearer picture of your remaining battery life.
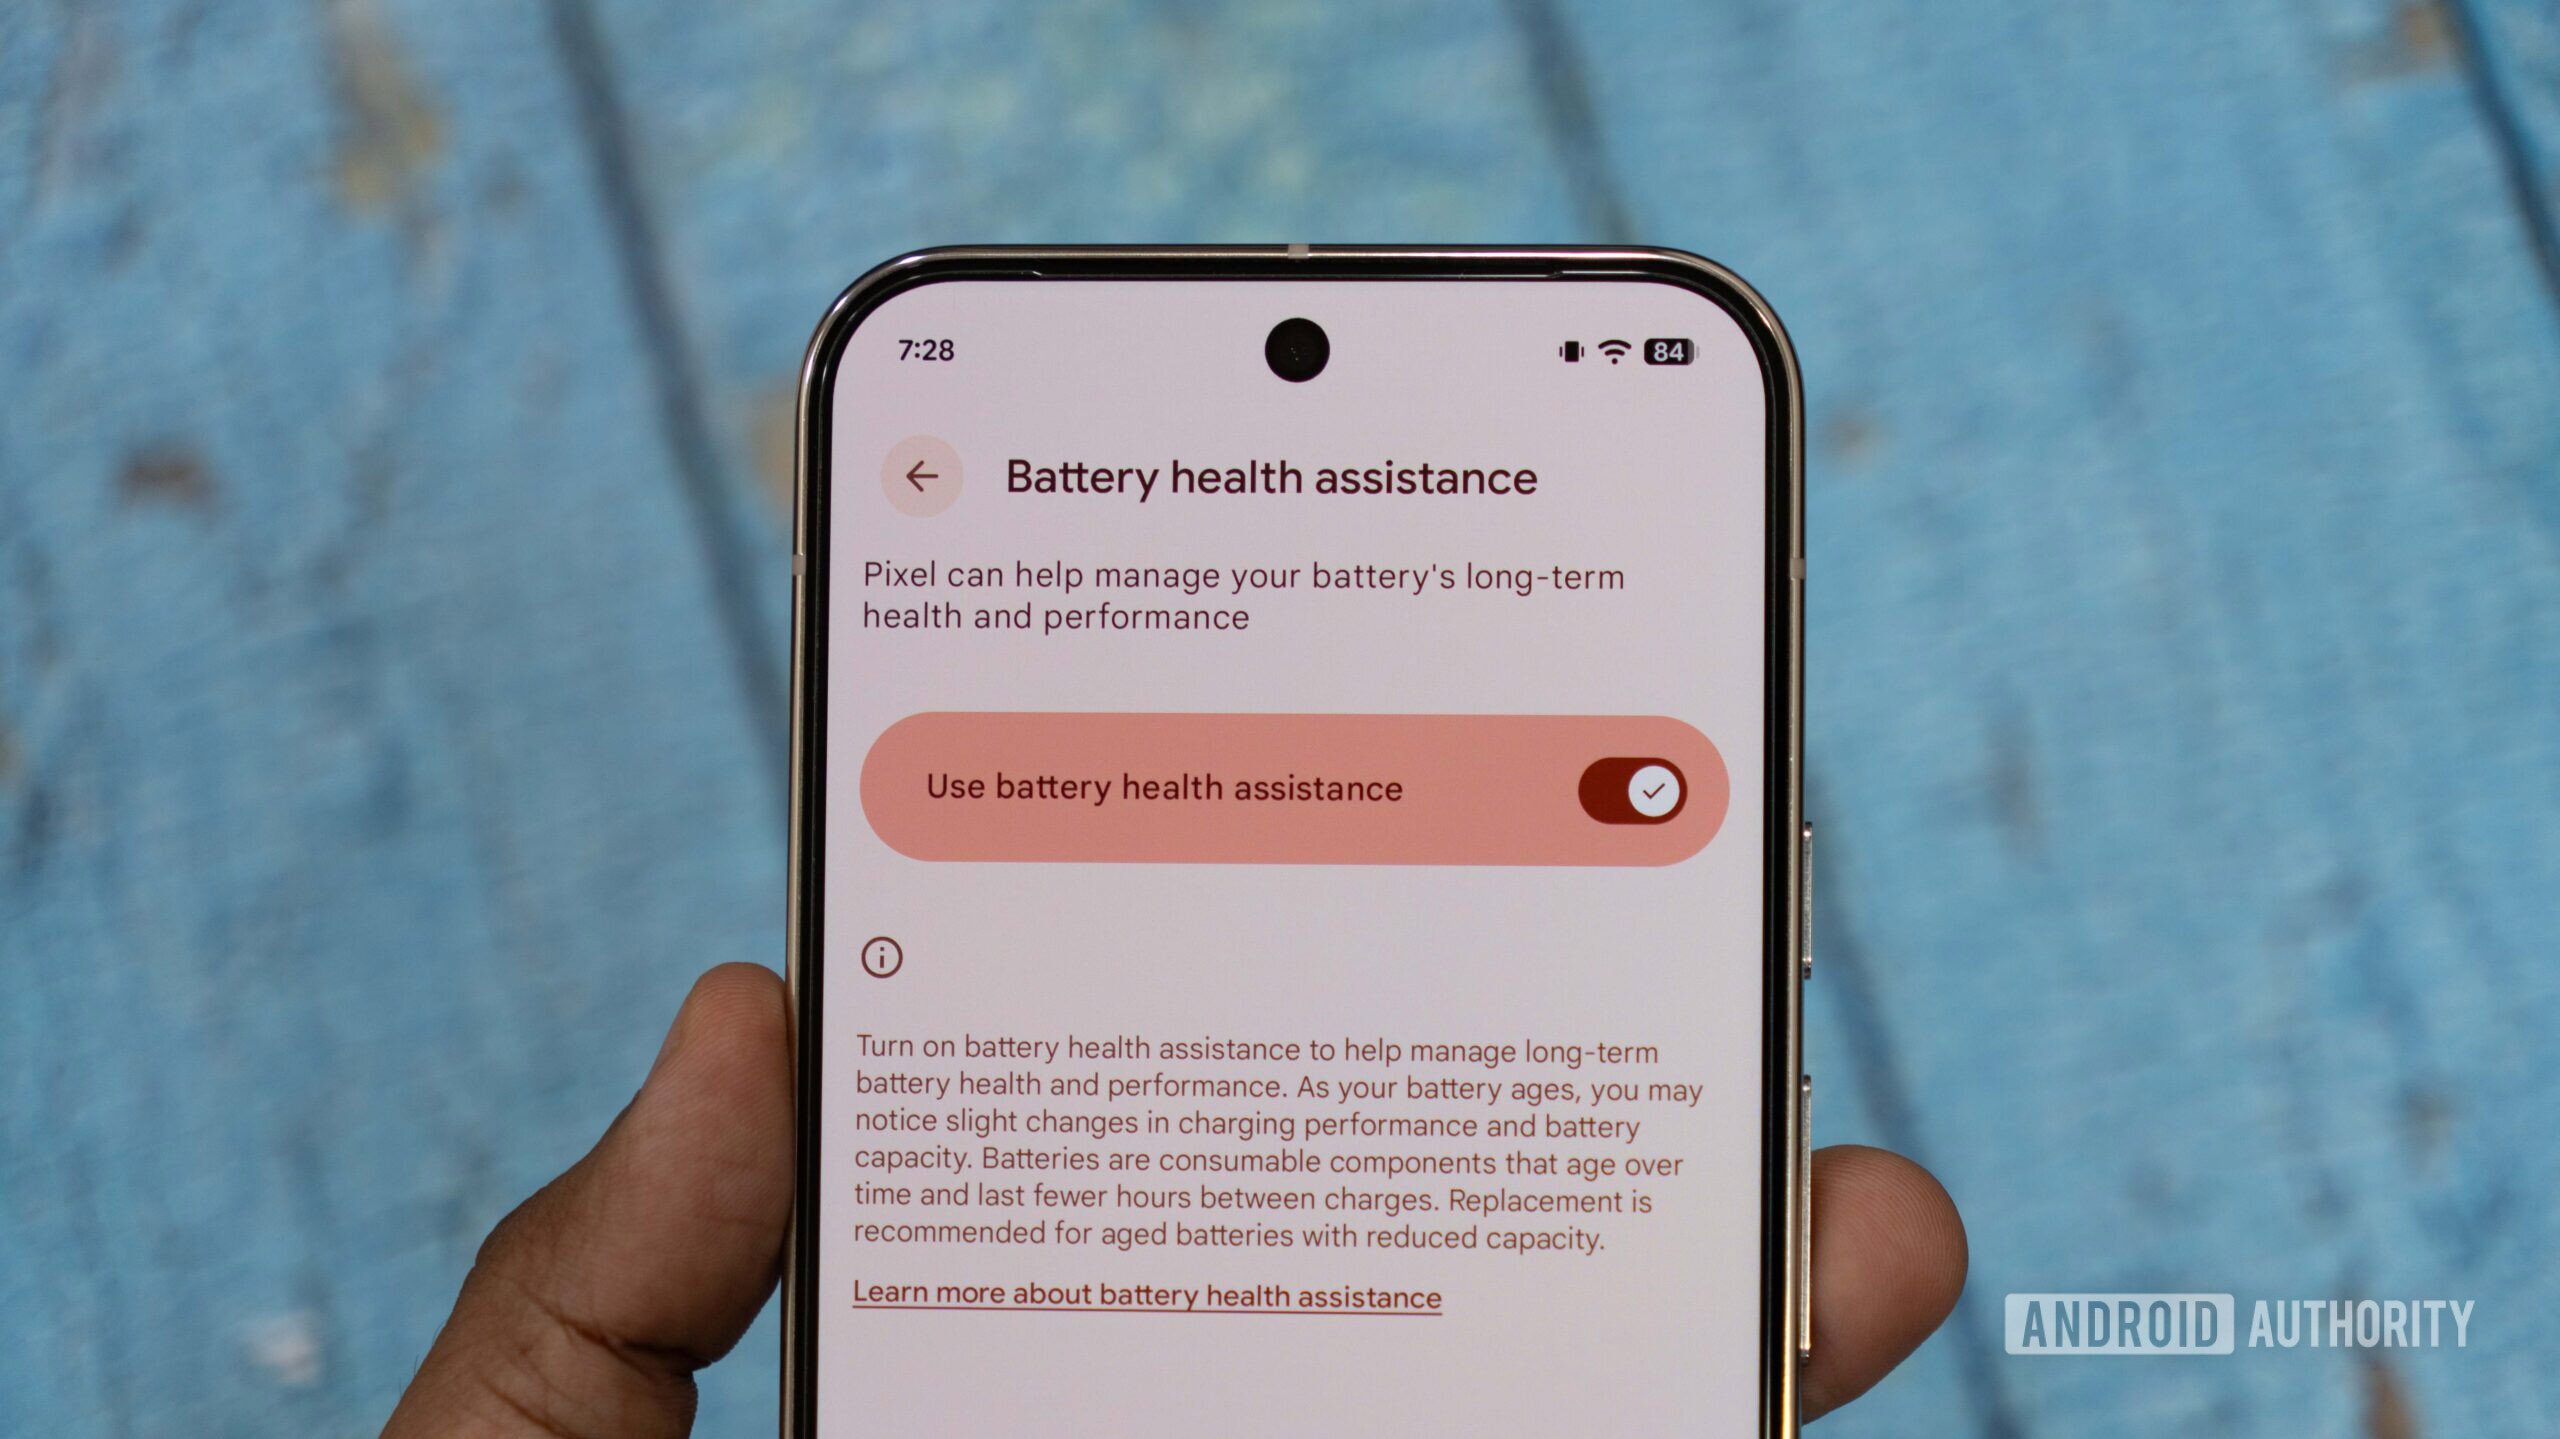
While you’re on the Battery settings page, there’s another crucial tweak you should make to dramatically extend the lifespan of your phone’s battery. Tap on Battery Health and then Charging Optimization. This feature will be on by default and set to “Adaptive charging,” which intelligently learns your daily routine. It charges your phone at a slow pace to hit 100% just before you typically unplug it. This is good, as it helps keep your battery healthy, but we can do better.
You can increase the overall longevity of your battery by limiting its charge to 80% of its capacity.
For maximum battery health, enable the Limit to 80% option. This forces your Pixel to stop charging once it reaches 80%. While it might seem counterintuitive to give up 20% of your daily battery capacity, the long-term benefits are enormous. Lithium-ion batteries degrade fastest when they are held at very high or very low states of charge. By keeping your battery between 20% and 80% as much as possible, you can significantly reduce wear and tear, potentially adding years to the usable life of your phone. Unless you’re a very heavy user who consistently needs every last drop of power, this is a trade-off worth making.
Ryan Haines / Android Authority
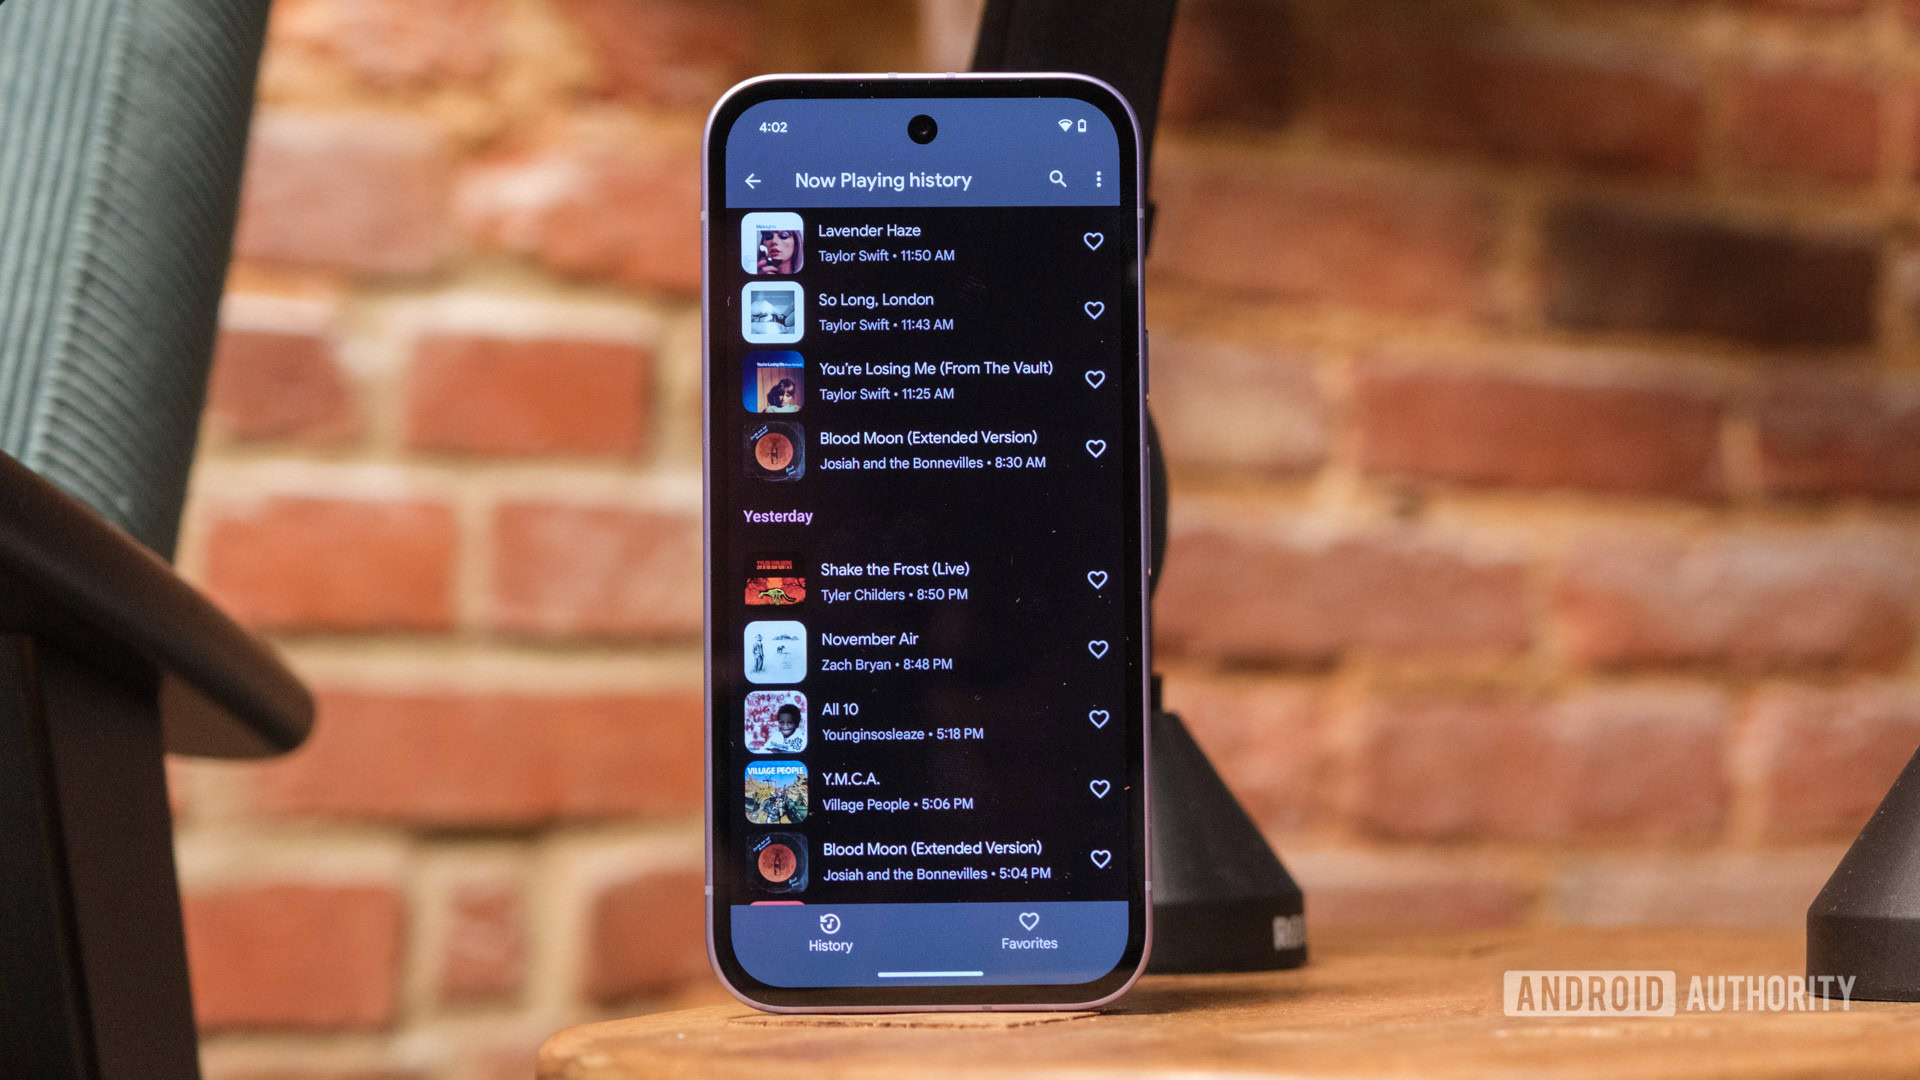
Now Playing is one of the coolest and most-loved exclusive features on Pixel phones. When you first set up your device, Google asks if you want to turn it on, and you absolutely should. The feature uses on-device machine learning to constantly listen for music playing around you. When it identifies a song, it discreetly displays the title and artist on your lock screen. It’s been an incredible tool for me over the years, helping me discover new music at coffee shops, stores, or in a friend’s car without ever having to pull out my phone and frantically open Shazam.
Super-charge the Now Playing feature with better recognition and album art.
Recently, Google supercharged this feature by integrating the power of Google Search. Previously, all song analysis happened completely offline on your device, which is great for privacy but could occasionally fail to identify more obscure tracks. With the new enhanced mode, your phone can leverage Google’s massive online database for better recognition. As a bonus, it will also display album art in the Now Playing history, which is a really nice touch.
To make sure this more powerful version is active, do the following:
With this enabled, you’ll get more accurate results and a richer visual experience, making one of the Pixel’s best features even better.
Rita El Khoury / Android Authority
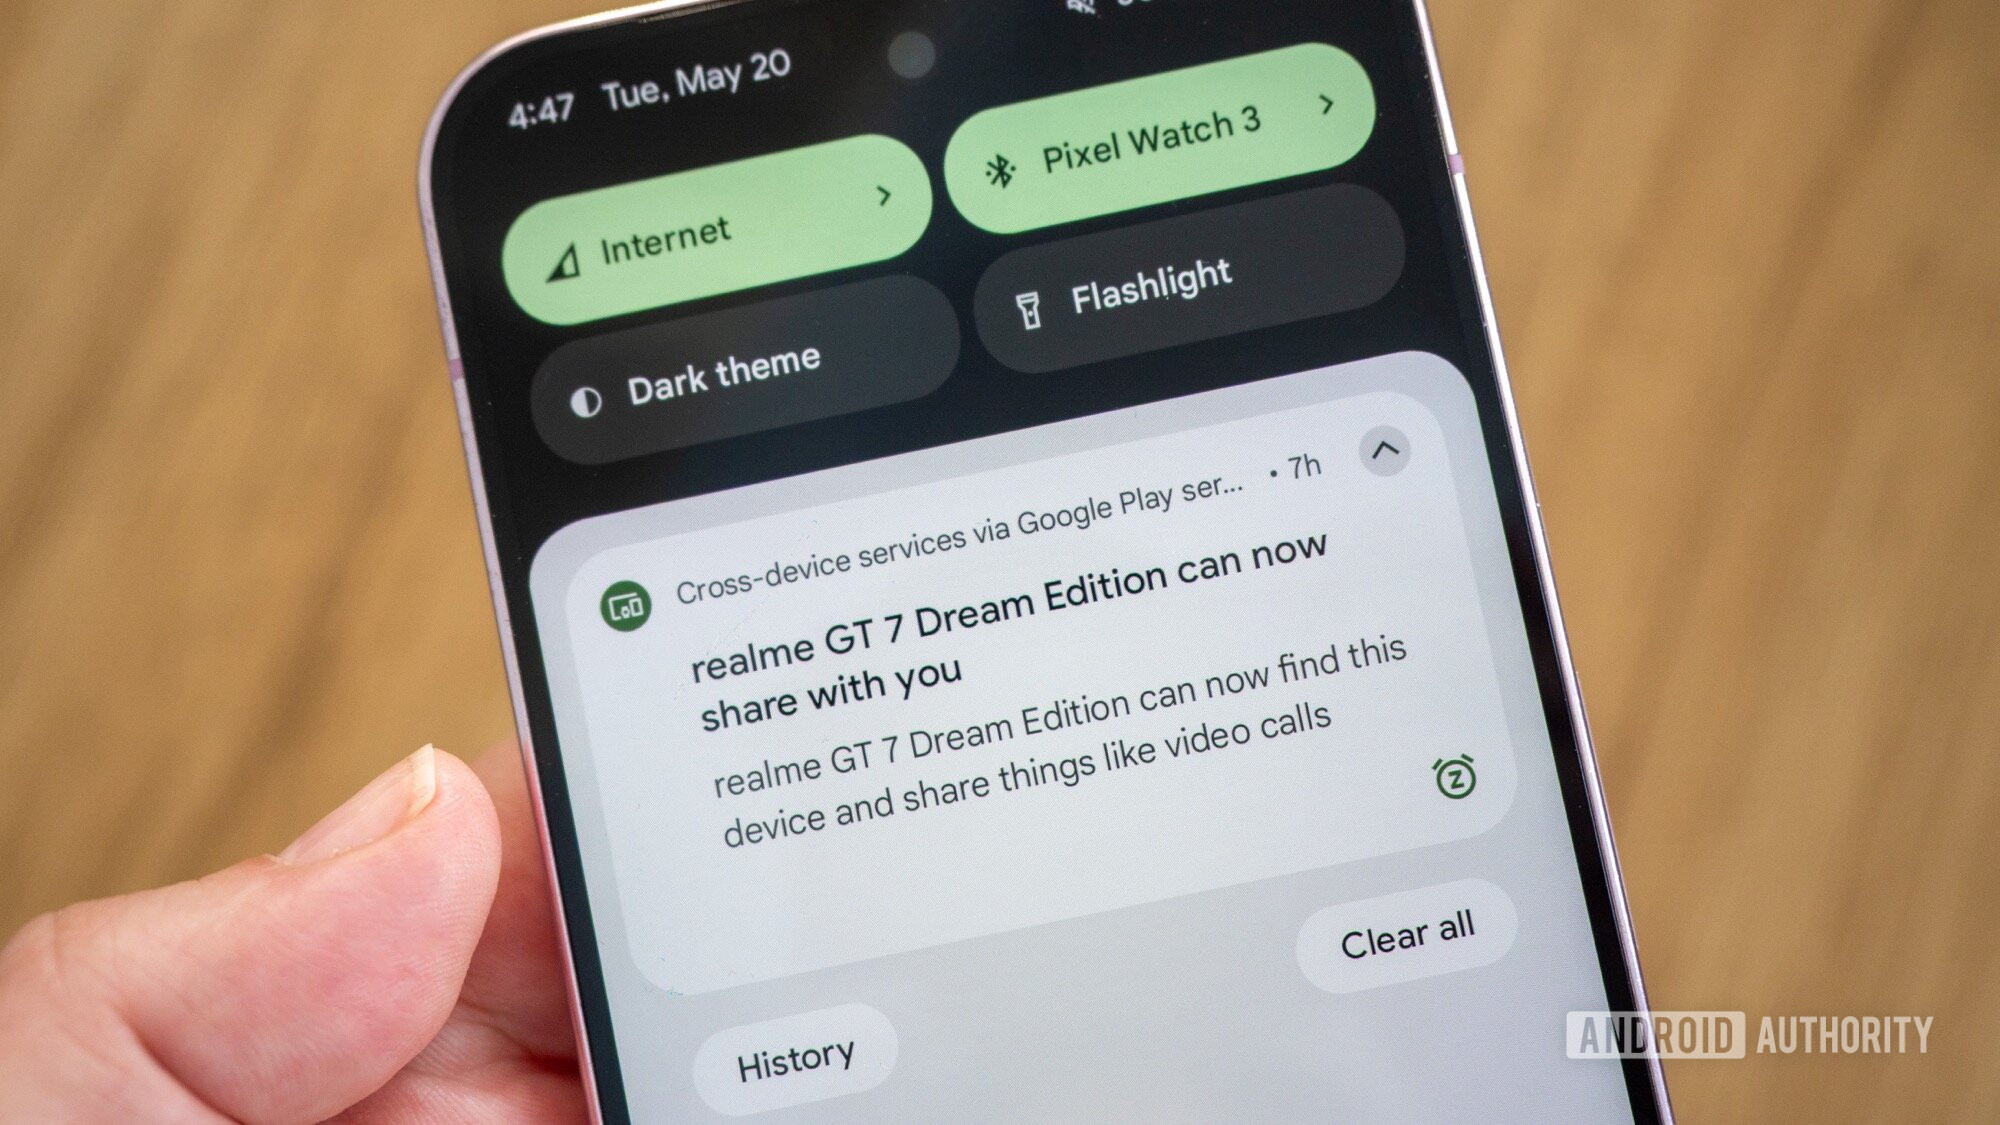
The idea of a seamless ecosystem where all your devices work together in harmony has long been the holy grail of consumer tech. With cross-device services, Google took a significant step toward making that a reality for Android users. If you own multiple Android devices, like a phone and a tablet, this feature is a must-have. It enables cool new ways for your gadgets to interact. For example, you can be on a Google Meet call on your tablet and, with a single tap, seamlessly transfer it to your phone if you need to leave the house.
Make your Android devices work better together.
Here’s how to get it set up:
The whole concept of cross-device services is relatively new. As such, Google might bring more features to this later on, so it’s a good idea to have this enabled even if you don’t plan on using it for now!
Rita El Khoury / Android Authority
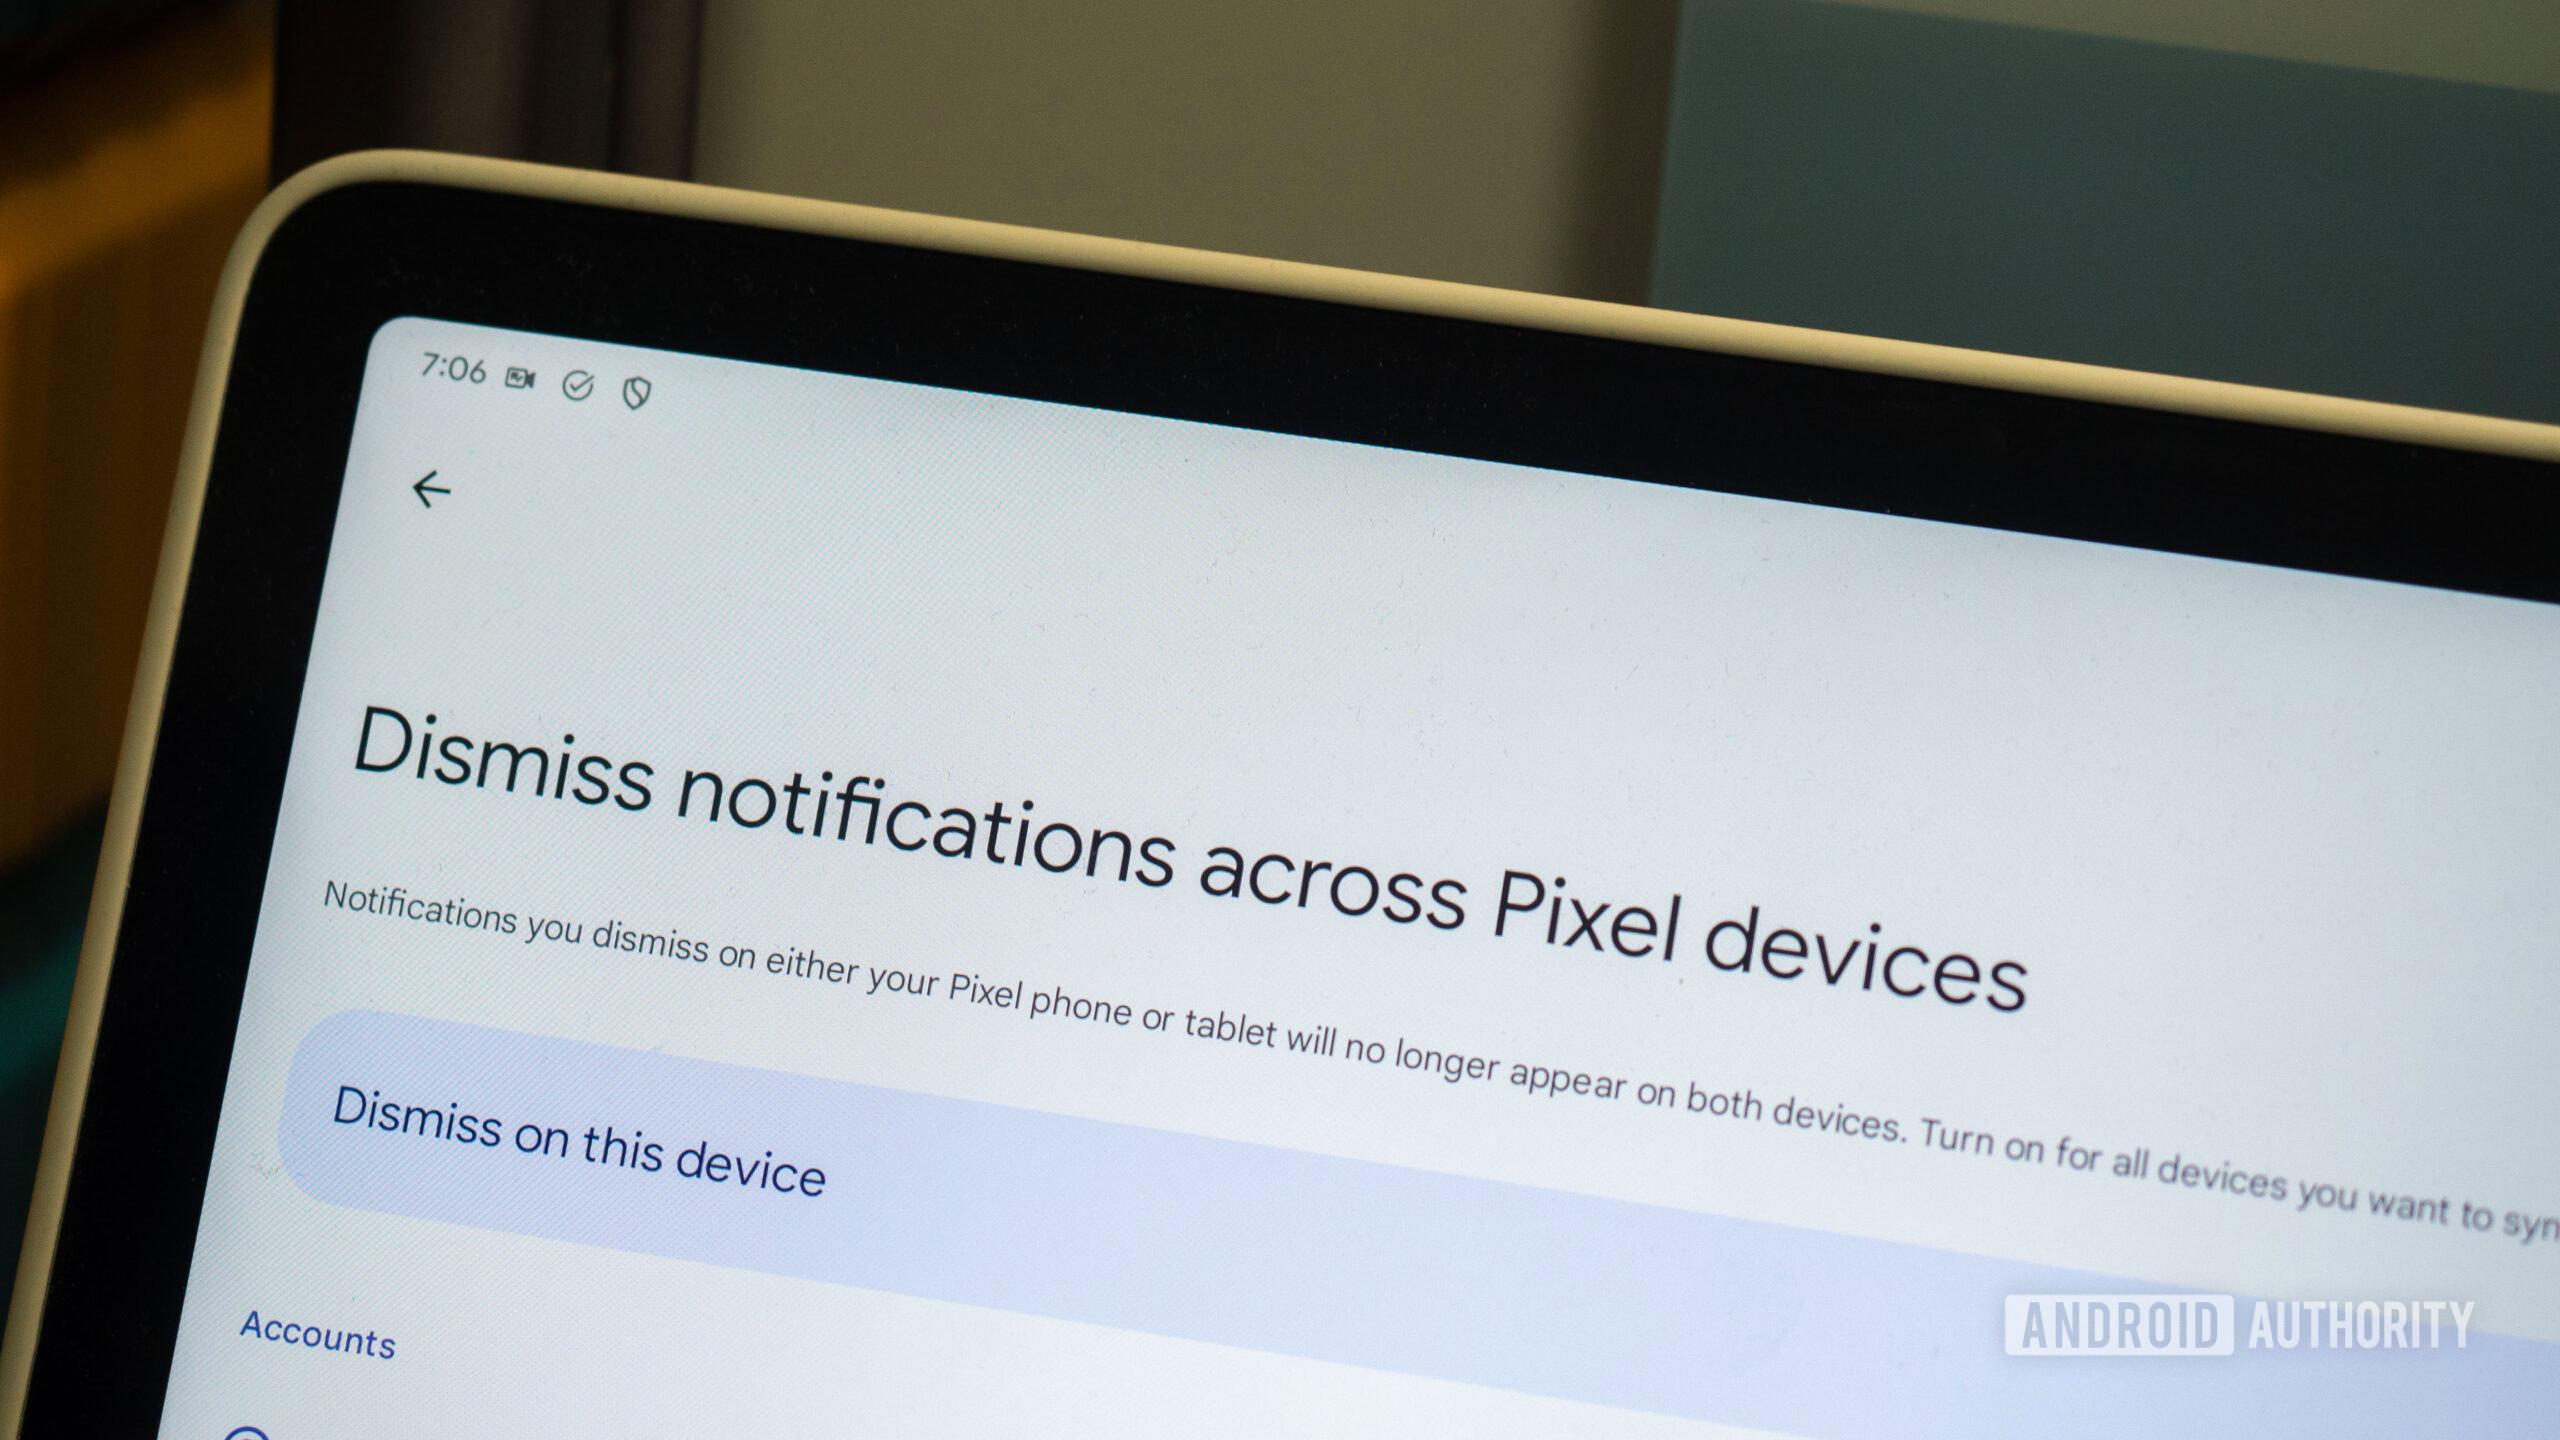
Building on the theme of a multi-device ecosystem, here’s a tip specifically for those who own more than one Pixel product. One of the most frustrating small annoyances of having a Pixel phone and a Pixel Tablet is dealing with the same notification on every single screen. You get a Gmail alert on your phone and swipe it away, only to see the same alert sitting on your tablet, waiting to be dismissed again. It’s redundant and, frankly, a waste of time.
Swipe away a notification on your Pixel phone and have it automatically swipe away on your Pixel Tablet.
Thankfully, Google has a solution. You can sync notification dismissals across your Pixel devices, so when you clear an alert on one, it automatically disappears from the others. It’s a simple change that makes managing your digital life feel much more streamlined.
To turn it on, follow these steps on each of your Pixel devices:
Now, when you swipe away that email on your phone, it will vanish from your tablet a moment later. It’s awesome.
Here’s a bonus tip for everyone, whether you have one Pixel or five. We all have that one friend or family member who sends texts like this:
Each message triggers a separate notification, causing your phone to buzz and beep incessantly. To combat this, you should enable Notification Cooldown. This clever feature detects when you’re getting a bunch of notifications from the same app in quick succession. Instead of alerting you at full volume every single time, it will gradually lower the volume/vibration of the notification sounds, making the experience much less disruptive.
To activate it:
Your sanity will thank you (but also, please tell your friends to just send one text).
Rita El Khoury / Android Authority
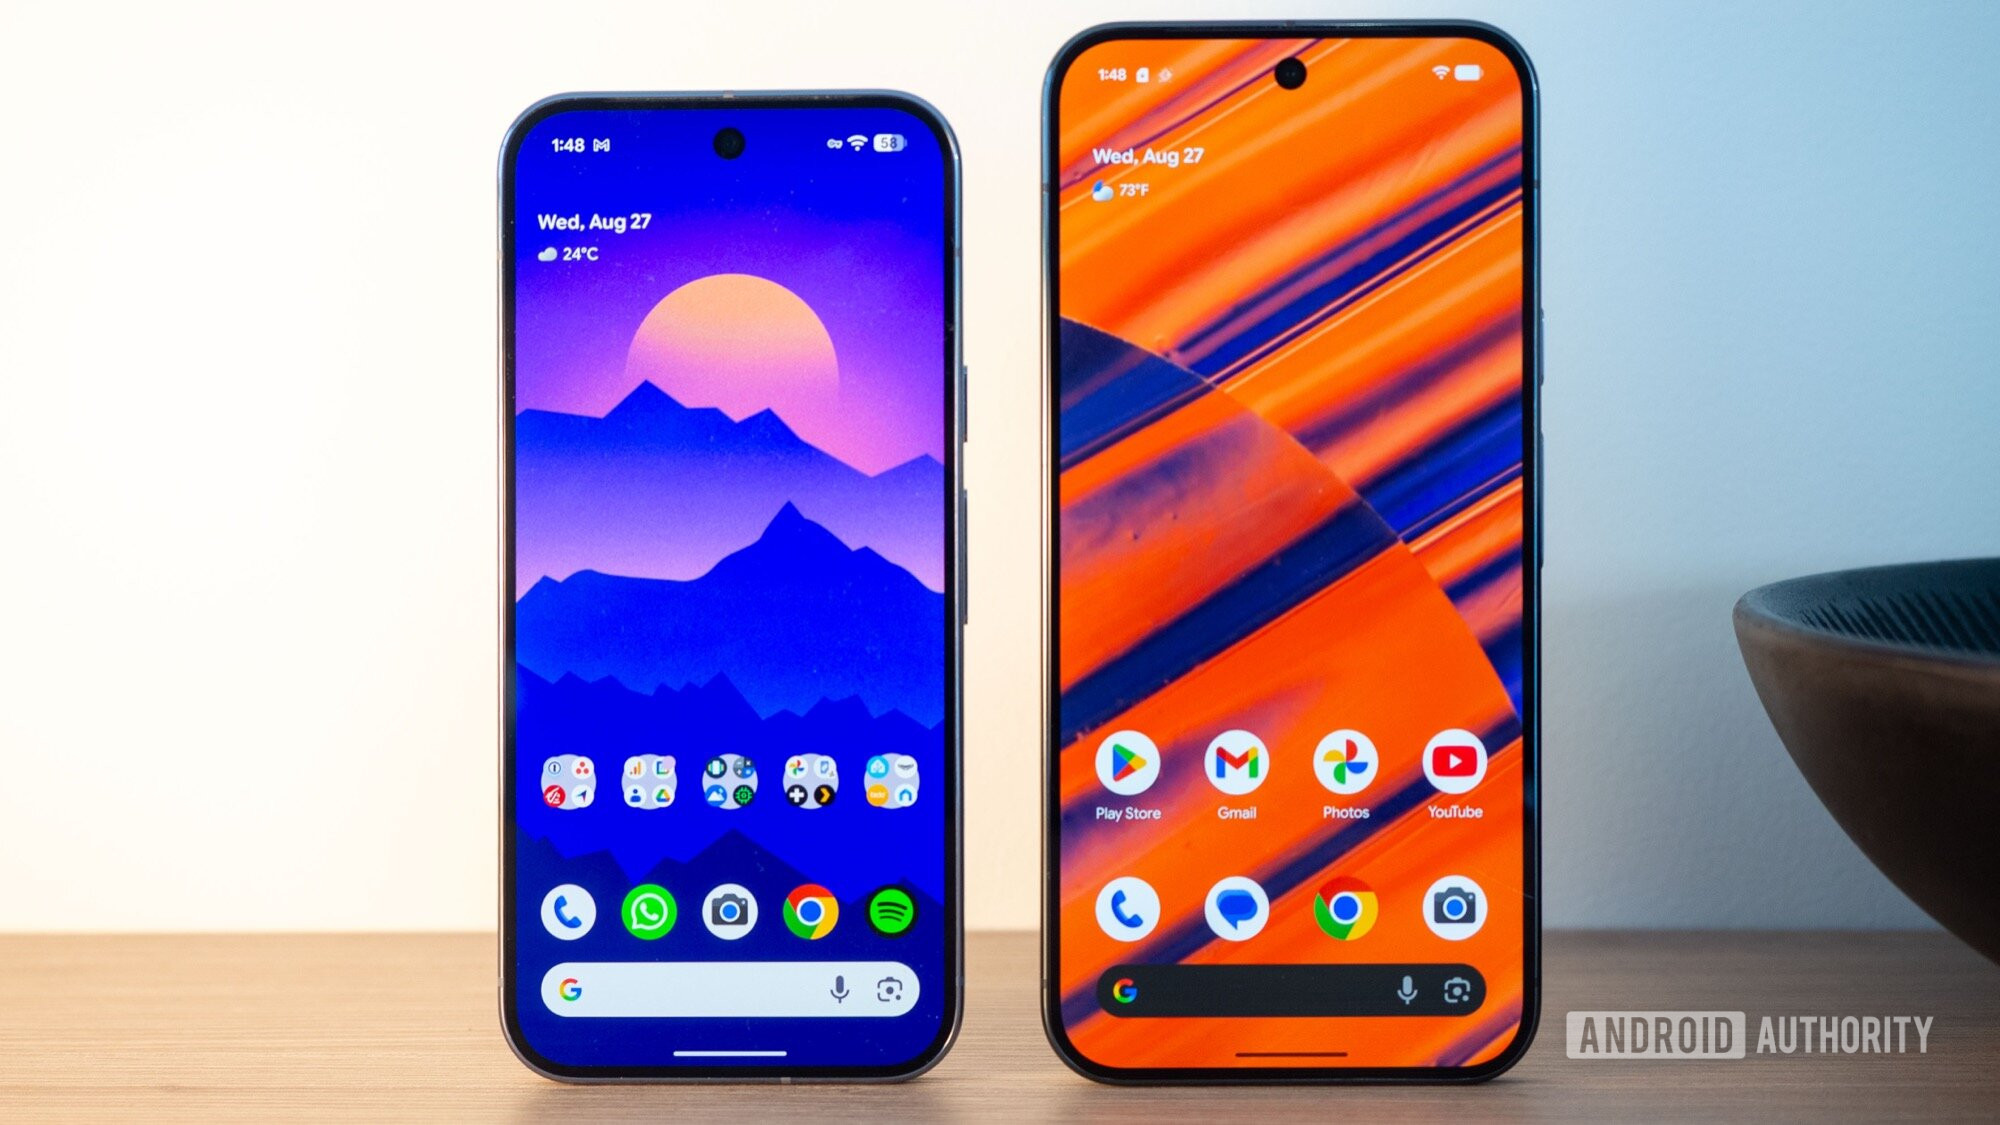
If you’ve ever used an iPhone, you’ll know that it doesn’t have an app drawer. Every app you install gets dumped directly onto your home screen, creating page after page of icons. For many of us who prefer Android, this feels like pure chaos. The app drawer is a core part of the Android experience, providing a clean, organized space where all your apps live, leaving your home screen free for only the most important shortcuts and widgets.
Android shouldn’t be like iOS. Here’s how to make it less like it.
Unfortunately, Android still mimics iOS in one frustrating way by default: as you download new apps from the Play Store, their icons are automatically added to your home screen. This quickly leads to clutter. Thankfully, unlike on iOS, you can easily turn this behavior off.
Here’s how to make your apps go straight to the app drawer, where they belong:
With that simple change, your home screen will remain the pristine, curated space you designed it to be.
While you’re customizing your home screen, here’s another tweak you might enjoy. By default, the app grid is set to a size that might feel a bit too spacious for some. If you want to fit more app icons or widgets on a single page, you can easily change the grid layout.
This will increase the grid density, allowing you to fit more shortcuts onto each page of your home screen, making it even more efficient.
Rita El Khoury / Android Authority
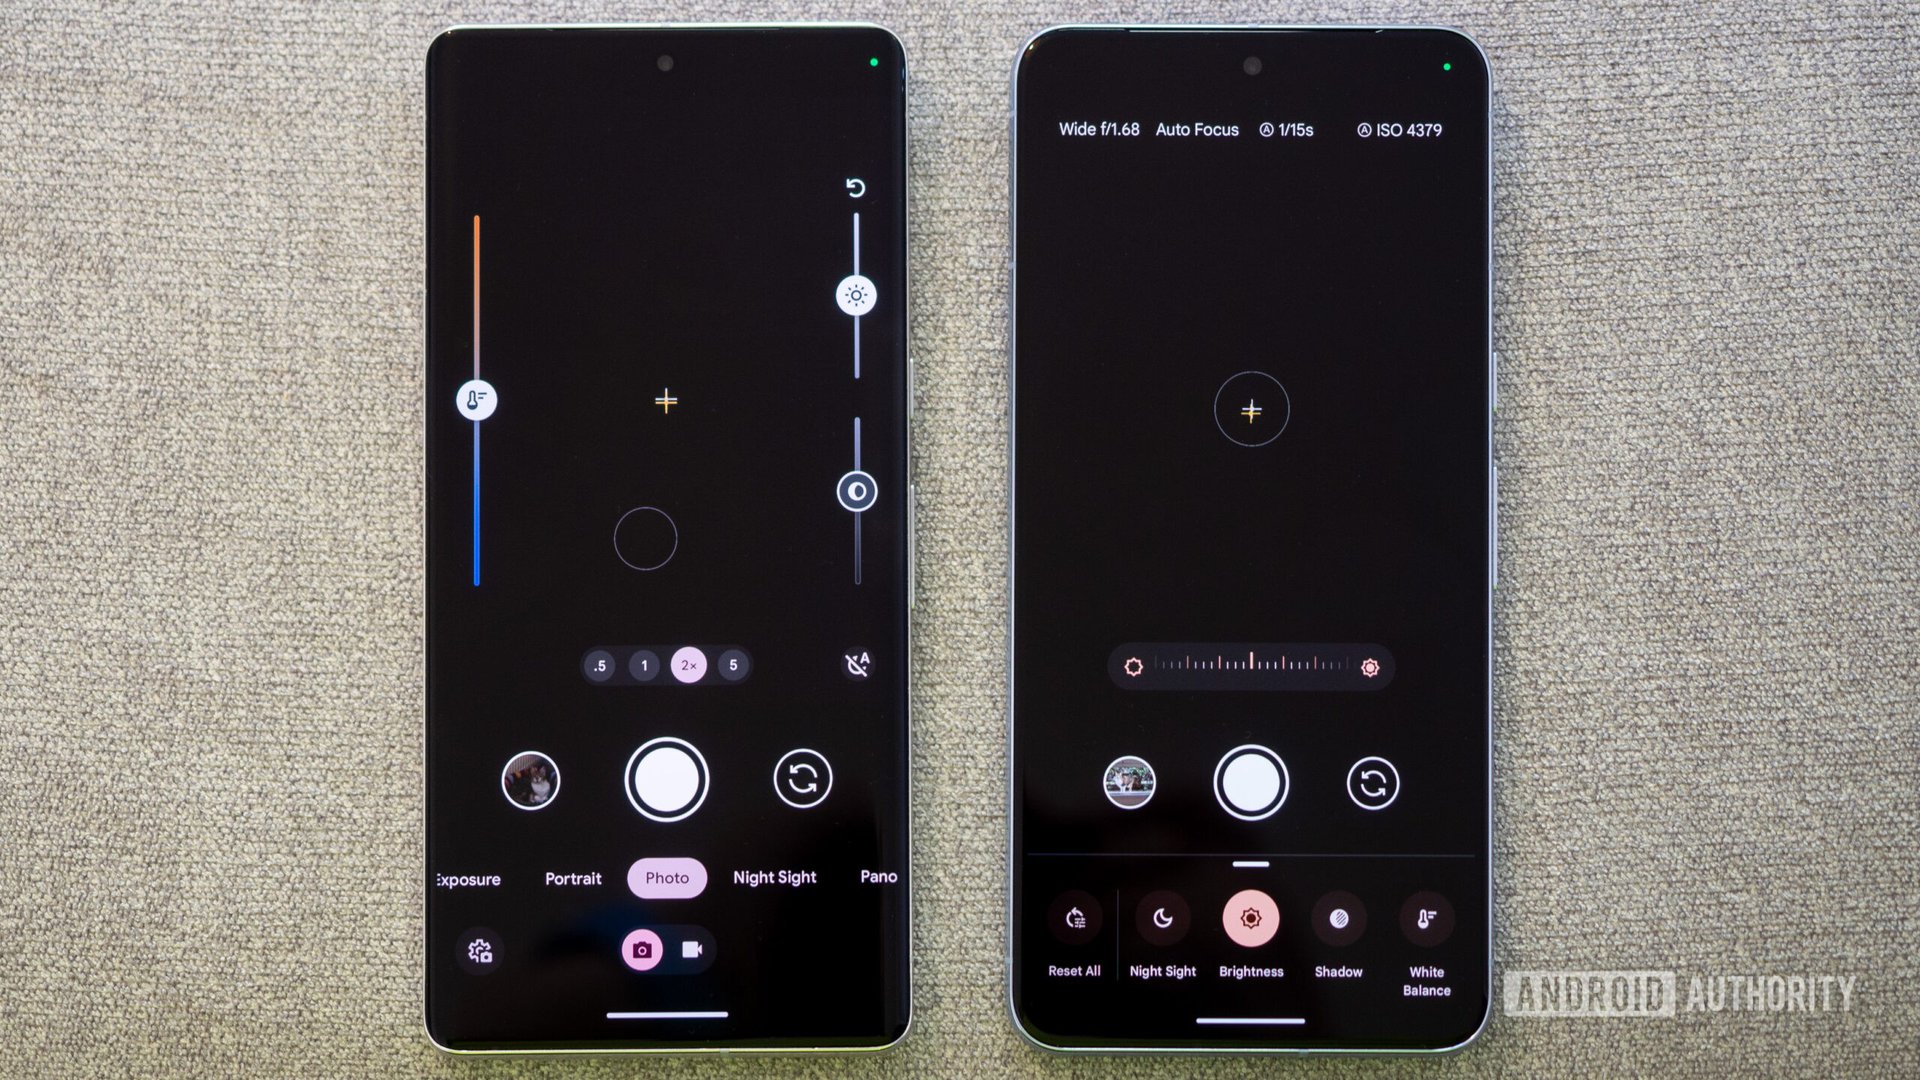
Back in the day, Google’s beloved camera app featured persistent on-screen controls for fundamental photography settings like brightness, shadows, and white balance. They were always there, giving photographers quick and easy access to manual adjustments. Then, for reasons only Google understands, the company removed them, burying these options in menus.
The Pixel camera app used to have some terrific on-screen controls. Thankfully, you can bring them back.
Google did eventually bring them back…sort of. The controls are available again, but they’re hidden by default. When enabled, you can access them by simply tapping anywhere on the viewfinder inside the camera app. It’s not quite as immediate as having them always on screen, but it’s a huge improvement over digging through menus.
To get these controls back, you need to turn them on first:
Now, whenever you’re lining up a shot, just tap on the viewfinder to bring up those classic sliders and fine-tune your photo to perfection.
Rita El Khoury / Android Authority
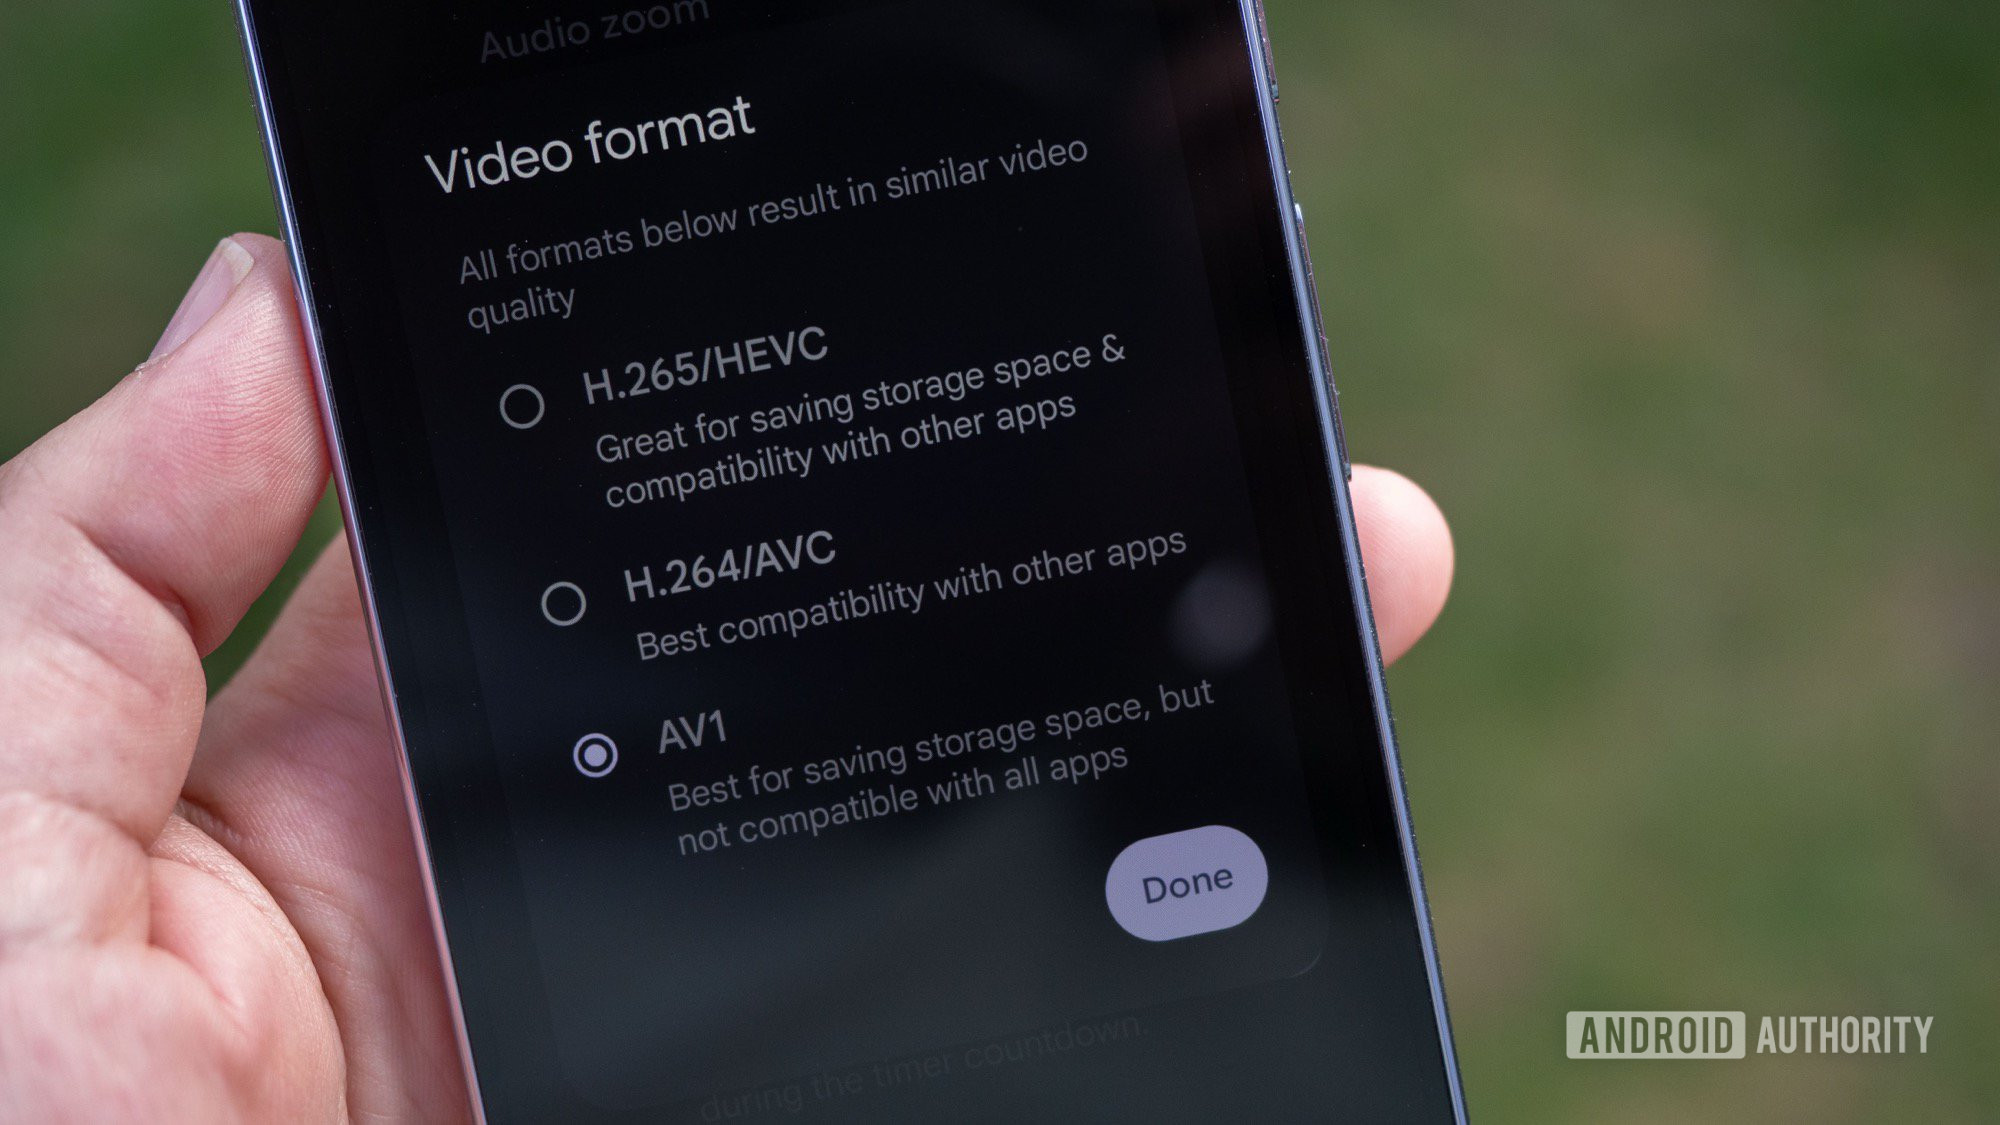
This next tip is a bit more technical, but it’s an absolute game-changer, especially if you shoot a lot of video or opted for a Pixel 10 with 128GB of storage. The Pixel 10 series introduces the ability to record video using three different codecs (a codec is simply the technology used to compress and decompress digital files). The new third option is called AV1, and you should definitely turn it on.
Use the AV1 codec to conserve space on your phone by shrinking video file sizes.
In essence, AV1 is a newer, more efficient way of compressing the video footage you shoot. It allows you to maintain the same high video quality while creating significantly smaller file sizes. To give you a concrete example, a one-minute video shot in 4K at 60fps using the older AVC codec will be about 550MB. That same video shot with AV1 will be just 440MB. That’s a 20% reduction in file size, which can add up to gigabytes of saved space over time.
So, why isn’t this on by default? The only catch is compatibility. Because AV1 is a newer standard, some older devices, video players, or video editing software might not support it. However, if you’re like most people and primarily watch your videos on your phone or upload them to modern platforms like YouTube, Instagram, or TikTok, you’ll have no issues at all.
Here’s how to enable it:
Unless you have a specific professional workflow that requires an older codec, this is a change you should make immediately.

C. Scott Brown / Android Authority
If you splurged on a Pixel 10 Pro or Pixel 10 Pro XL, you have the most advanced camera system ever put into a Pixel phone. As such, you get access to some special features the standard model doesn’t, including the ability to shoot portrait mode photos at a full 50MP resolution.
On other Pixel models (and by default on the Pro), portrait mode shots are binned down to 12MP. This process combines data from multiple pixels on the sensor into one, which is often great for low-light performance but sacrifices some fine detail. While the results are good, other flagship phones have offered higher-resolution portrait modes for a while, providing more detail and often better edge detection (the software’s ability to separate the subject from the background blur).
Harness the full power of your 50MP sensor with this Portrait Mode trick.
With the Pixel 10 Pro, you can finally capture those incredibly detailed, high-resolution portrait shots. The only minor downside is that the image files will be larger, but for important photos of people or pets, the jump in quality is absolutely worth it.
To activate this mode:
You should immediately see a noticeable improvement in the clarity and detail of your portrait photos.
Mishaal Rahman / Android Authority
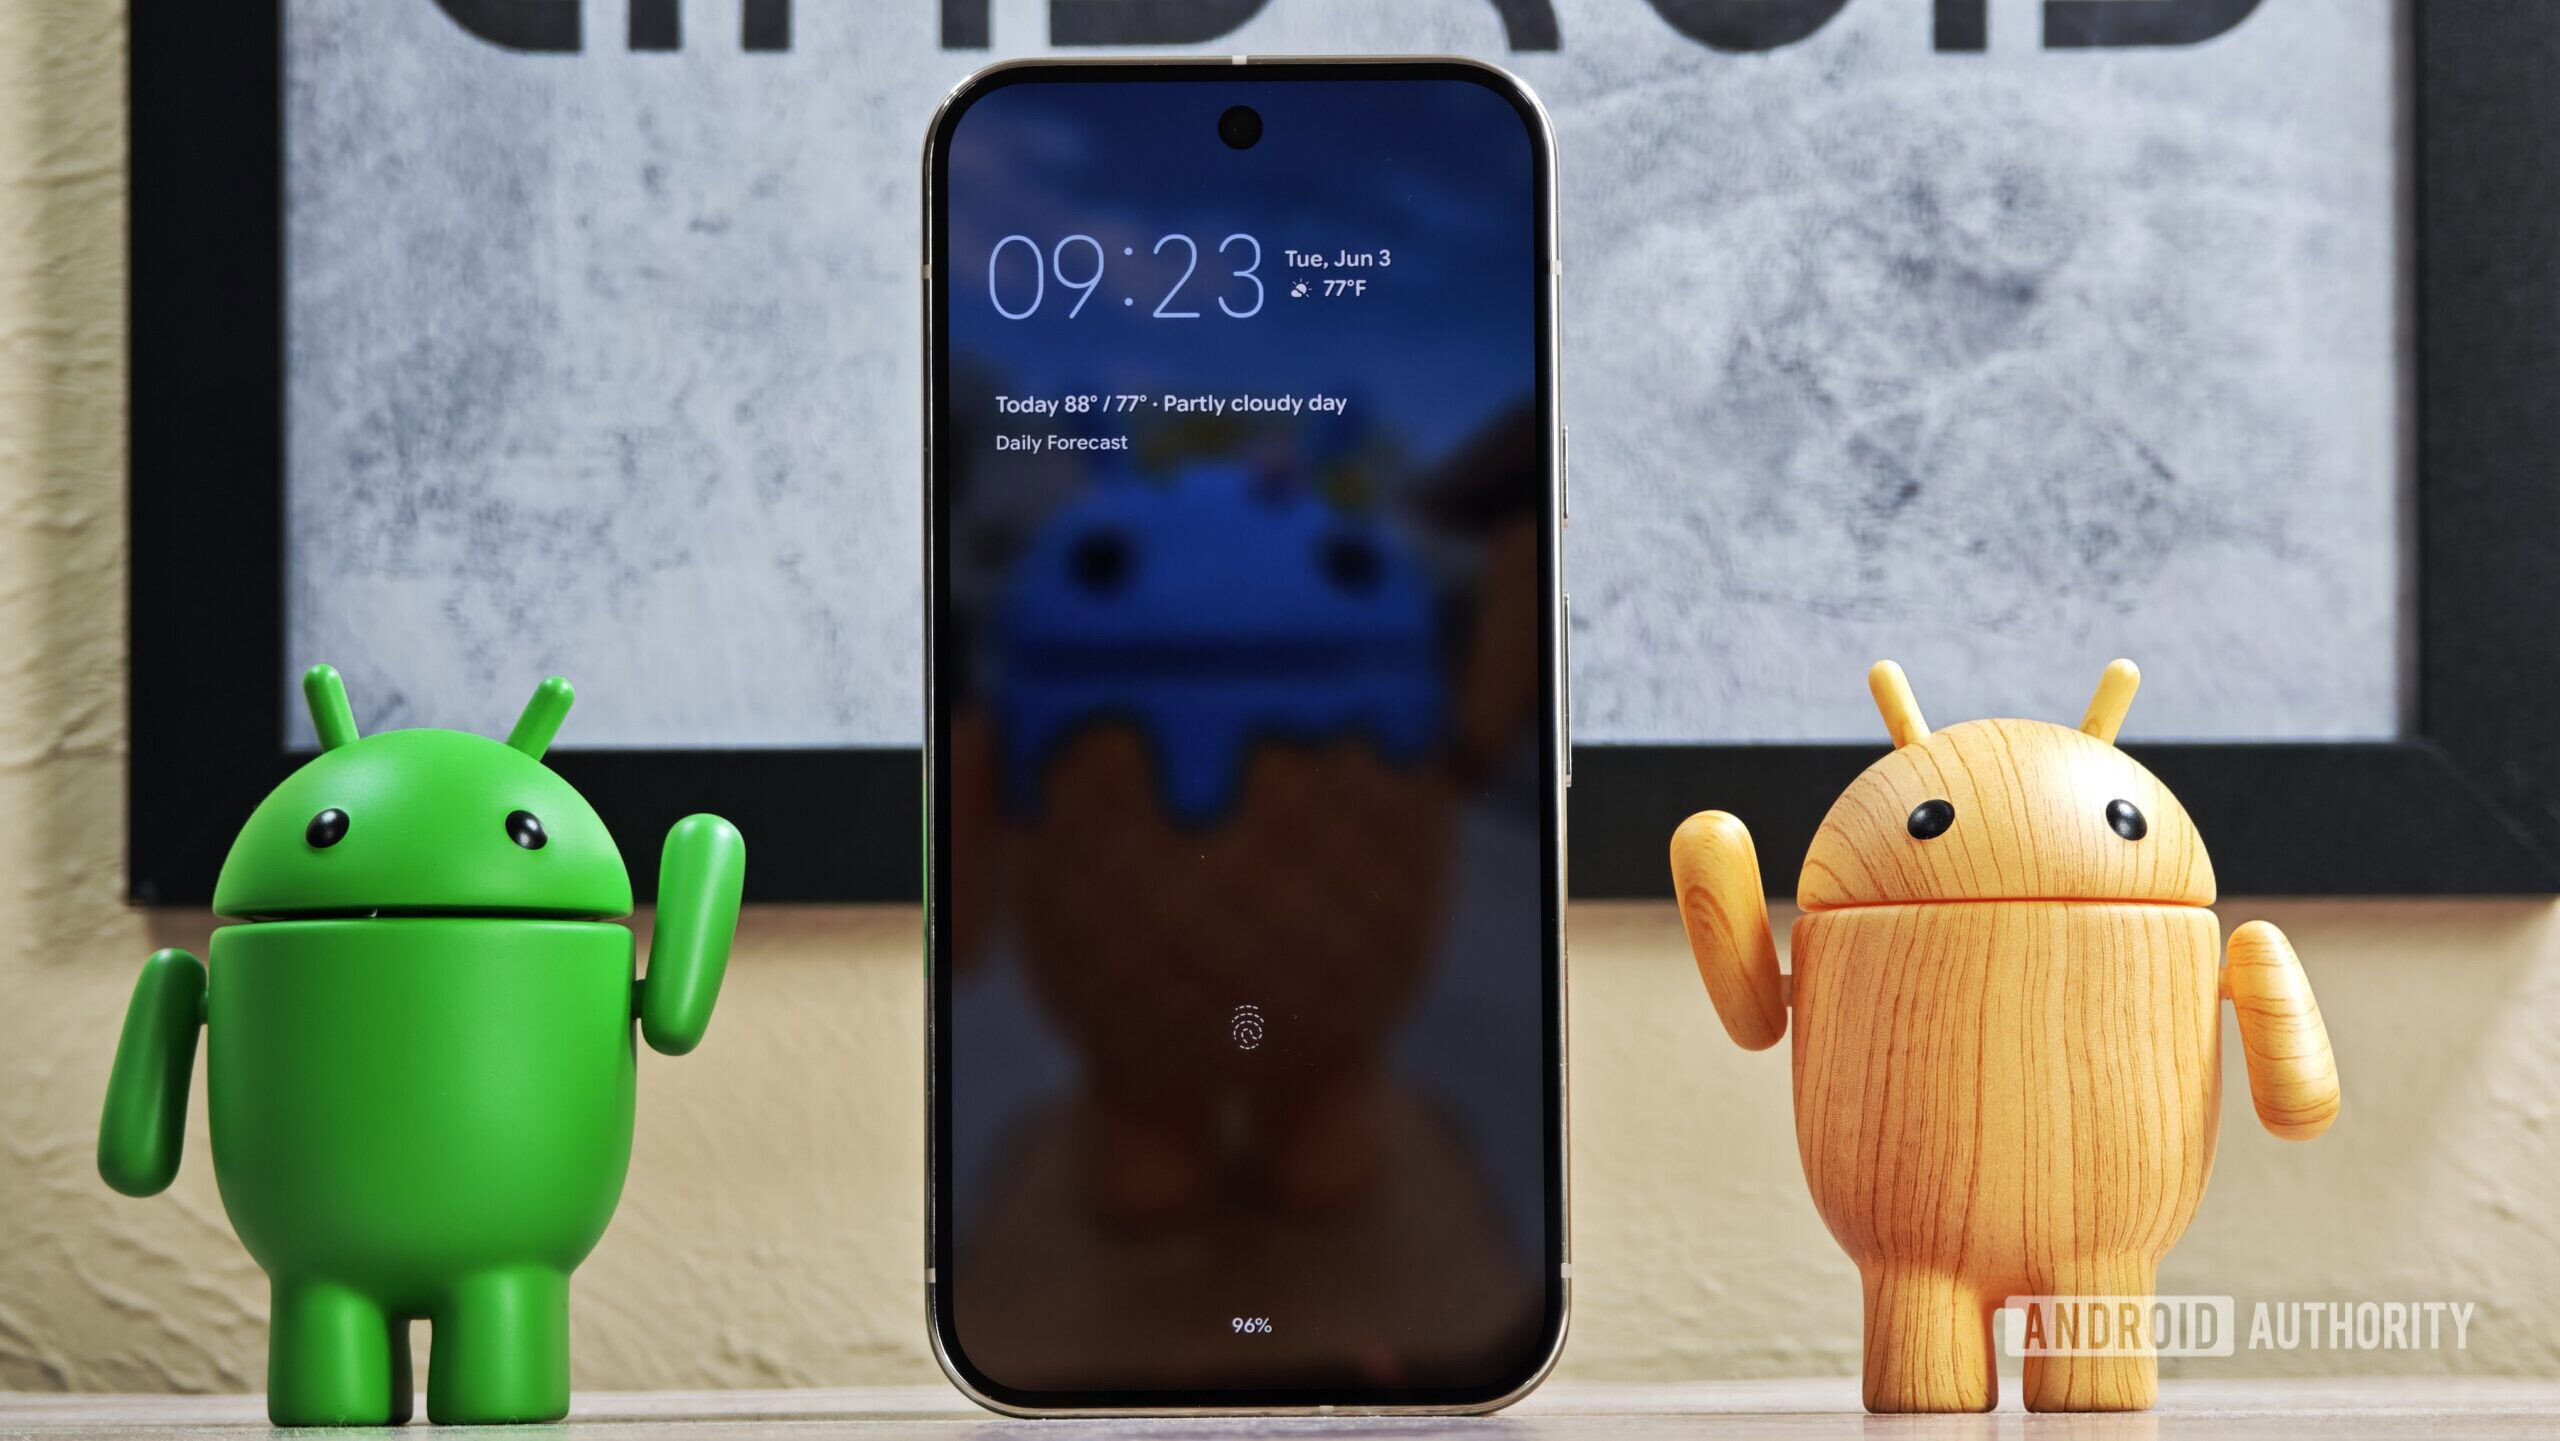
My final tip is another one exclusive to the Pixel 10 Pro and Pro XL, and it’s all about making your phone feel more personal. On all previous Pixel phones, the always-on display (AOD) has been a stark, utilitarian affair: a black screen with white text for the time, date, and notification icons. It’s functional, but not exactly exciting.
Make your AOD uniquely yours with this new wallpaper feature just for the Pixel 10 Pro and Pro XL.
With the Pixel 10 Pro/XL, you can now set your lock screen wallpaper to appear on the AOD. It’s a dimmed, power-efficient version of your wallpaper, but it adds a wonderful splash of personality to a screen that was once just black and white. If your wallpaper is a photo of a loved one, a pet, or a favorite landscape, it makes your phone feel much more uniquely yours, even when it’s idle.
Here’s how to enable it:
Now, when you lock your phone, your wallpaper will gently fade into view on the always-on display. Keep in mind that this will use slightly more battery than the traditional black-and-white display. In my testing, the difference was negligible and well worth the aesthetic improvement. However, if you’re someone who needs to squeeze every possible minute out of a charge, you might prefer to leave this off. For most people who charge their phone nightly, you’ll be totally fine.
Rita El Khoury / Android Authority
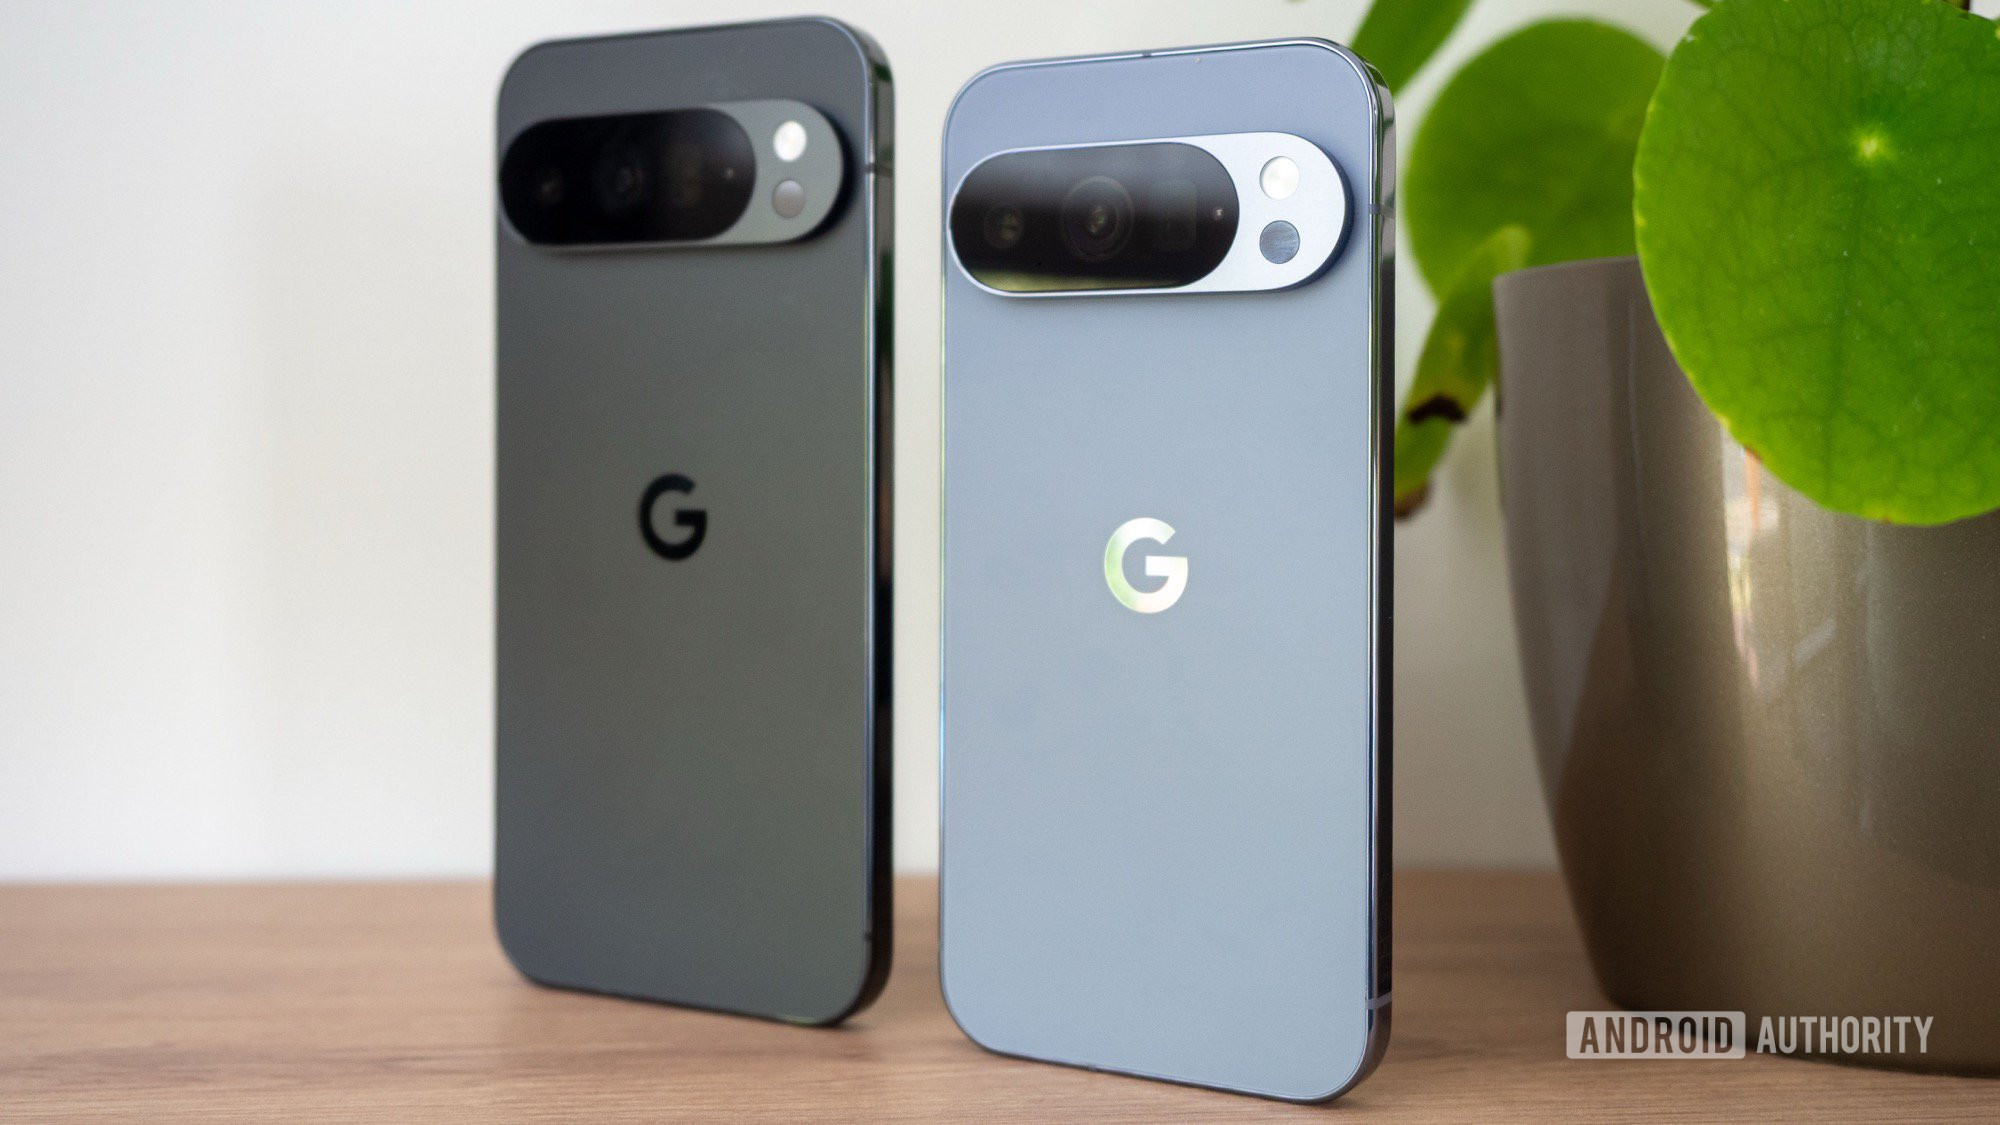
And there you have it — the first ten things I immediately change on a new Pixel 10 to get the absolute most out of it. Hopefully, you found a few new tricks in here to try on your own device.
Before you go, I have one last bonus tip: explore the My Pixel app. This app comes pre-installed on your phone (it used to be called Pixel Tips) and it’s an incredible resource. It’s filled with tutorials and information on all the cool things your phone can do, including new features that arrive in Google’s quarterly Pixel Drops. I highly recommend opening it up every few months to see what’s new. You’d be surprised how many powerful features go unnoticed by the average user.
Now, I want to hear from you. What are the first settings you change when you get a new phone? Do you have any essential tips or tricks that I missed? Let me know in the comments below. I’m always excited to see if our readers have any clever suggestions I can add to my own routine!

Google Pixel 10
New optical zoom camera
Long-term updates
Loaded with Google AI features

Google Pixel 10 Pro
Top-tier specs with small display
Excellent cameras
Powerful AI tools
Top-notch software

Google Pixel 10 Pro XL
Biggest non-folding Pixel phone
Best specs and AI features
Thank you for being part of our community. Read our Comment Policy before posting.


